Rails developers like me are on a high with the release of Rails 5. Yes, DHH (David Heinemeier Hansson, creator of Ruby on Rails) has something really cool for us this time. One of the cool factors in Rails 5 is Action Cable, the framework that integrates WebSocket with Rails. Real-time features on Rails, such as live chat, notifications, interactive online games, and so on are all possible thanks to Action Cable.
Before we go into the tutorial on creating a real-time messaging app using Action Cable, let’s take a quick look at the server-side components of Rails 5.
Rails 5 Server-Side Components
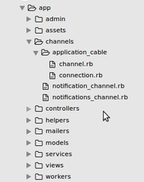
There is a new folder called channels and a subfolder called application_cable in Rails 5. The subdirectory contains two new files named channel.rb and connection.rb (see screenshot below).
 Connection is the core part of a client-server relationship. A connection object is instantiated for every WebSocket accepted by the server. This connection object is the parent of all the channel subscriptions made by that client. Action Cable provides a connection.rb file, which is inherited from ActionCable::Connection::Base to implement authentication. The connection.rb file is similar to the Rails Application Controller file. The connection does not serve any purpose other than authentication and authorization.
A channel is similar to a controller in an MVC architecture. It encapsulates a logical unit of work. The ApplicationCable:Channel class in channel.rb file is inherited from Action Cable::Channel::Base, which serves the purpose of encapsulating the shared logic. All other channel files inherit from the class ApplicationCable:Channel
Connection is the core part of a client-server relationship. A connection object is instantiated for every WebSocket accepted by the server. This connection object is the parent of all the channel subscriptions made by that client. Action Cable provides a connection.rb file, which is inherited from ActionCable::Connection::Base to implement authentication. The connection.rb file is similar to the Rails Application Controller file. The connection does not serve any purpose other than authentication and authorization.
A channel is similar to a controller in an MVC architecture. It encapsulates a logical unit of work. The ApplicationCable:Channel class in channel.rb file is inherited from Action Cable::Channel::Base, which serves the purpose of encapsulating the shared logic. All other channel files inherit from the class ApplicationCable:Channel.
Using Action Cable in Rails 5 for Live Messaging
Let’s create a simple application using which two users can connect to a website and post messages. We need to provide a mechanism through which a message from any one user is broadcast in real time to the other.
The diagram below is a simple illustration of how this application works when implemented using HTTP and WebSocket protocols. Being unidirectional, HTTP acts like a shared bulletin board, where all users come looking for messages. However, WebSockets are more of a direct delivery system, where message from one user will be forwarded to the intended recipient.
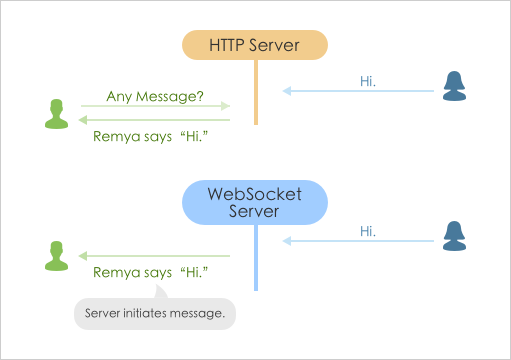 Messaging using HTTP Server and WebSocket Server.
Let’s see how we can create a simple live messaging application using Action Cable.
Messaging using HTTP Server and WebSocket Server.
Let’s see how we can create a simple live messaging application using Action Cable.
Configuring Action Cable
1. In cable.coffee file, uncomment the lines shown here.

2.
Uncomment the below line in routes.rb file to connect with Action Cable server.
 3. Allow Request Origins.
Only the origins passed as an array to the server config (application.rb or in corresponding individual environment config files, development.rb or production.rb) will be accepted by Action Cable. The origins can be specified as string or regular expressions. In a development environment, Action Cable accepts requests from localhost:3000 by default. The syntax to allow origins is as follows:
3. Allow Request Origins.
Only the origins passed as an array to the server config (application.rb or in corresponding individual environment config files, development.rb or production.rb) will be accepted by Action Cable. The origins can be specified as string or regular expressions. In a development environment, Action Cable accepts requests from localhost:3000 by default. The syntax to allow origins is as follows:
 4. Add the meta tag in application layout.
<%= action_cable_meta_tag %>
Creating a Channel
5. C
reate a WebSocket channel with the name Notifications using the command rails g channel notifications.

This command will generate two main files in our app folder:
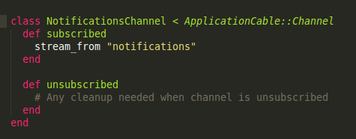
- notifications_channel.rb => handles server-side logic
- notifications.coffee => handles client-side logic.
The file app/channels/notifications_channel.rb contains the information on how the messages should be handled. Every channel has subscribed and unsubscribed methods. ”Subscribed” method is called when a client-side subscription is initiated. “Unsubscribed” method is called when a client-side subscription is terminated. Whenever a client-side subscription is initiated, messages are broadcast to the notifications channel. This notifications channel instance is related with the parent connection instance.
Broadcasting Messages
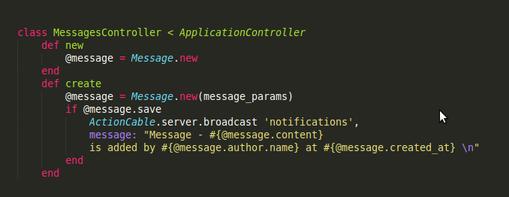
6. Define a controller method for broadcast data during message creation.
When a message is created, then the message, user name, and time are attached and broadcast through the notifications channel to all subscribed users.
Displaying Messages on Client-Side
7. Define Client-Side Subscription (in app/assets/js/channels/notifications.coffee)
The client needs to subscribe to any content broadcasting by the notifications channel. “App.cable.subscriptions.create” method will invoke the subscribed method defined in notifications_channel.rb file. From this moment on, all the messages broadcast through the notifications channel will be available to this particular client through the parent connection instance. Three default methods for server communication from the client side are:
- connected: Called when the subscription is ready for use.
- disconnected: Called when the subscription is terminated by the server.
- received: Called when the server sends data to the client.
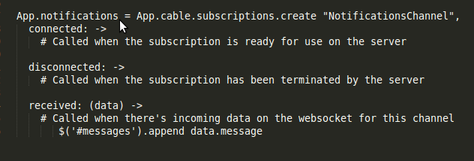 In this example, the message send by the server is appended to a div tag (<div id='message'>) and shown live.
To Conclude...
I hope this short tutorial on how to create a simple live messaging app comes in handy when you go exploring Action Cable in Rails 5. There are more real-time features that you can create with Action Cable. I’ll be trying out some of those next. I hope you do too!