

Scaling machine learning pipelines using PyTorch can be a pain.
You typically start a PyTorch-based machine learning project by defining the model architecture. Then you run it on a CPU machine and progressively create a training pipeline. Once the pipeline is done, you run the same code on a GPU or TPU machine for faster gradient computations. You update the PyTorch code to load all the tensors to the GPU/TPU memory with a ‘.to(device)’ function call. Now comes the difficult part: what if you want to use distributed training for the same pipeline? You have to overhaul the code and test it to make sure nothing is broken.
Why sweat the small stuff? Let's use PyTorch Lightning instead.
Understanding PyTorch Lightning
PyTorch Lightning, developed by Facebook’s AI Research lab, is not a new framework, rather it is a high-level interface to PyTorch. In simple terms, PyTorch Lightning abstracts away boilerplate code and makes it easy to implement engineering logic such as device-agnostic training, distributed training, etc. It also acts as a coding style guide for PyTorch developers. Before using PyTorch Lightning, we have to understand some basic stuff.
First, PyTorch Lightning separates a typical machine learning code base into two streams—research and engineering. The research part of the code includes the Neural Network architecture, algorithms, training, validation logic, etc. The engineering part of the code includes logic for scaling, choosing hardware to train on, distributed training, etc. The research part is where developers spend most of their effort. The engineering part requires less effort as most of the engineering logic is already implemented in PyTorch Lightning.
Second, developers have to follow the coding guidelines defined by PyTorch Lightning to make use of its features.
How PyTorch Lightning Makes Your Job Easier
PyTorch Lightning helps you create better machine learning pipelines. Let’s see how it does that.
Avoiding Boilerplate and Enforcing Clean Coding Style
Developers hate boilerplates and avoid them as much as they can. Boilerplates create unnecessary cognitive complexity and are vulnerable to bugs. To avoid this, PyTorch Lightning has abstracted the boilerplate logic into a higher class. It has also defined a code structure for machine learning projects. It specifies where each part of the Neural Network training algorithm should be defined.
A typical machine learning project has Neural network architecture, Data, Loss function, Optimizer function, and Train/Validation steps. Let’s see where each of these components should be defined in a PyTorch Lightning project.
- Lightning Module: This is the ‘Model’ class which should inherit from ‘pytorch_lightning.LightningModule’.
- Neural Network Architecture: It is recommended to place the architecture definition inside the Lightning Module class.
- Data: PyTorch Lightning requires data to be loaded as a DataLoader. It can be defined inside the Lightning Module or passed as an argument while starting the Trainer.
- Loss function: It is recommended to place the loss function inside the Lightning Module.
- Optimizer function: Optimizer should be returned by the Lightning Module method named ‘configure_optimizers’. This method can also return multiple optimizers in the case of architectures like GAN.
- Train and Validation: Training and validation logic should be included in the Lightning Module class methods ‘training_step’ and ‘validation_step’. These methods should get the output from the model, calculate the loss from the model output and return the loss. The backpropagation logic is automatically done by the PyTorch Lightning method.
Easing the Use of Advanced Features
PyTorch Lightning makes it easy to integrate advanced features into a machine learning pipeline by setting flags. Note that we can integrate these features in our machine learning pipeline with PyTorch code, but PyTorch Lightning offers this capability out of the box.
Some of the advanced features PyTorch Lightning supports are:
- Hardware-agnostic training
- Performance and bottleneck profiler
- Model checkpointing
- 16-bit precision
- Distributed training
- Logging
- Metrics
- Visualization
- Early stopping
Now let’s see how we can run distributed training on our project without changing our code. Assume we have three GPUs connected in a LAN network. To distribute our training algorithm, all we have to do is set some environment variables and flags in the Trainer.
First, we have to identify one of the GPUs as the master node. Then we will set the following environment variables in all three GPUs:
export MASTER_ADDR="x.x.x.x" (Network address of Master GPU)
export MASTER_PORT="xxxx" (Port number to use in communication)
export NODE_RANK="0" (0 for master and 1, 2 for other nodes)
Then we have to run the trainer on all three machines with the given flags.
Trainer(gpus=1, num_nodes=3, accelerator="ddp")
When all three nodes are connected, the distributed training starts. This is how easy it is to add advanced features to our project with PyTorch Lightning.
Reducing Bugs
Developers are less likely to introduce bugs because there is:
- Less boilerplate.
- Clean coding.
- Rigorous testing.
Implementing Pytorch Lightning Pipeline
Lightning Module
The Lightning Module is where we define our research code. You can find a template for the Lightning Module in this gist from a PyTorch Lightning author. A typical Lightning Module will have the following sections:
- Computations (init)
- Train loop (training_step)
- Validation loop (validation_step)
- Test loop (test_step)
- Prediction loop (predict_step)
- Optimizers and LR Schedulers (configure_optimizers)
The Lightning Module should inherit from the ‘pytorch_lightning.LightningModule’. All the logic for training a model is defined inside this Lightning Module and an instance of this class is passed to the Trainer Module to start training.
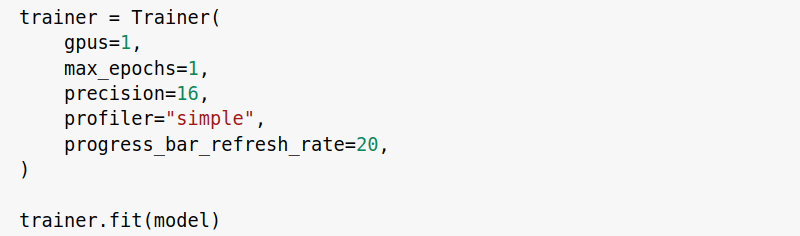
Trainer
The Trainer is where we add the engineering code. We only have to initialize the Trainer instance with some flags and call the fit method on it by passing an instance of the Lightning Module. PyTorch Lightning will start the training pipeline with the given flags. These flags define what features to use and what not to use while training.
trainer_cpu = Trainer()
trainer_gpu = Trainer(gpus=1)
trainer_tpu = Trainer(tpu_cores=1)
By setting some flags, we switched the device on which the training occurs without making any change to the Lightning Module.
Lightning Hooks
PyTorch Lightning makes it easy to use PyTorch but we lose the flexibility to change the code. This is where PyTorch Lightning Hooks come into play. With these hooks, we can add custom code inside the Lightning Module's training flow. You can find a detailed description of different hooks here.
PyTorch Vs PyTorch Lightning
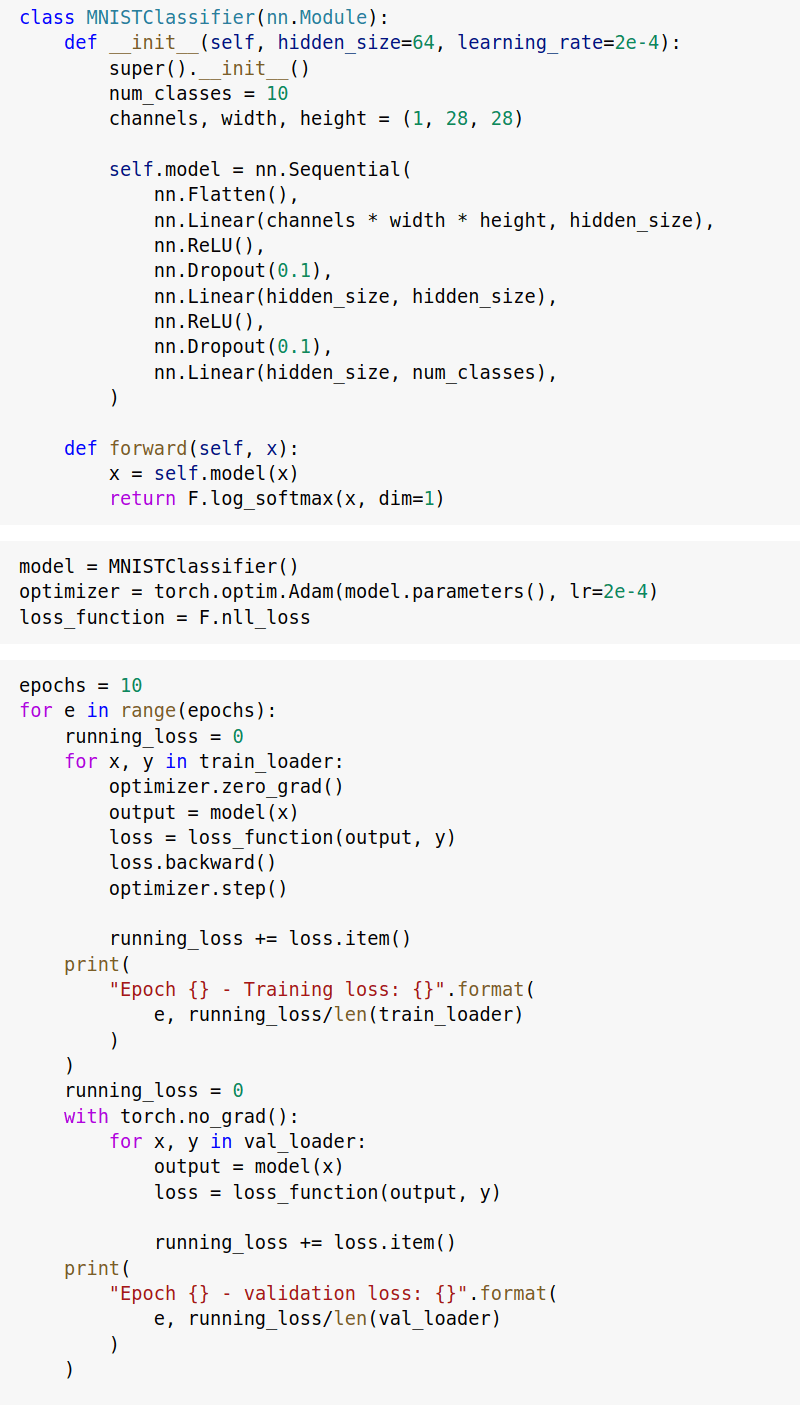
Let’s create a simple classification model to classify the MNIST digit dataset with PyTorch and PyTorch Lightning.
PyTorch
PyTorch Lightning
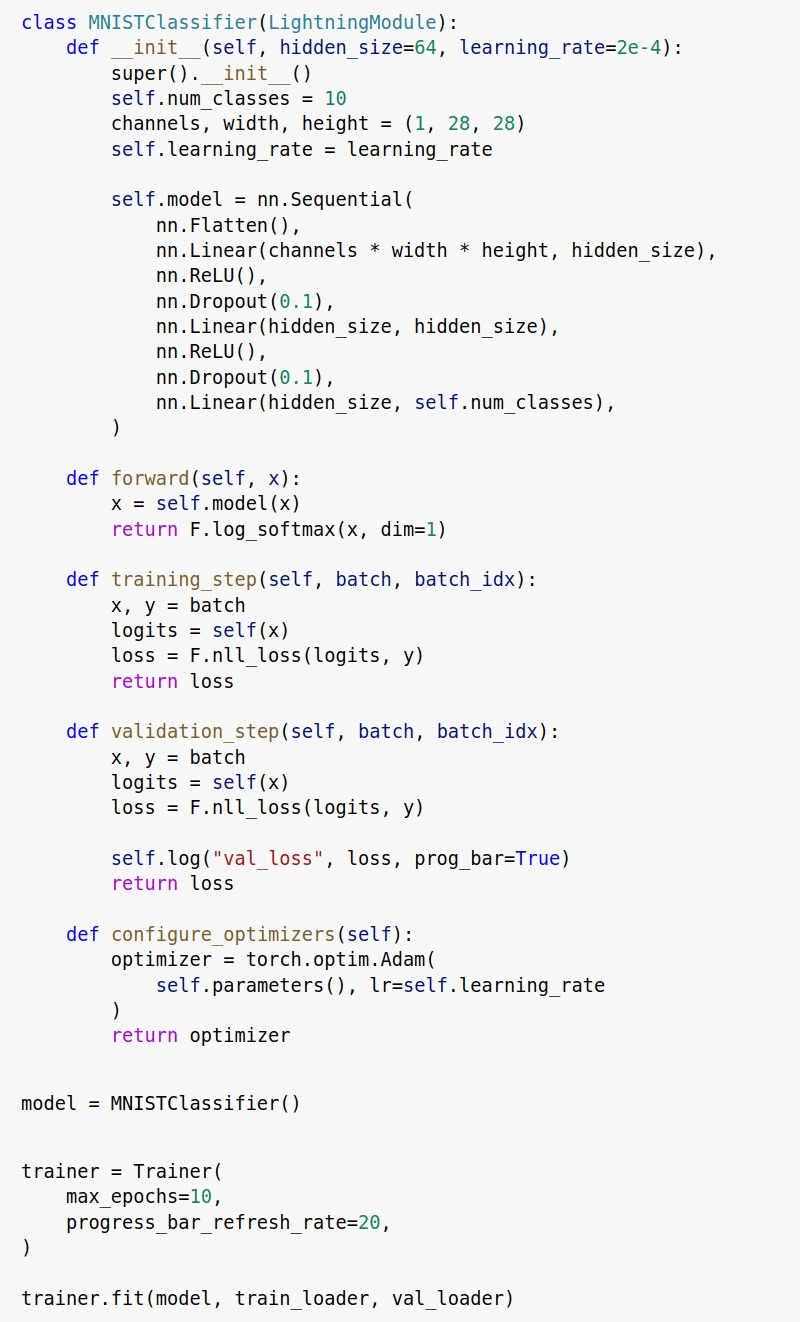
You might have noticed that in PyTorch Lightning code:
Everything related to the model is encapsulated in the MNISTClassifier class.
PyTorch Lightning keeps model-related details inside the model class itself, whereas in PyTorch, we can define these details anywhere in the code. This is part of the clean coding format that PyTorch Lightning wants developers to adhere to.
The Training loop, Validation loop, and Backpropagation are missing.
These are boilerplate code, which are part of every neural network training. PyTorch Lightning has abstracted them away in the ‘pytorch_lightning.LightningModule’ class.
New methods ‘training_step’, ‘validation_step’ and ‘configure_optimizers’ are introduced.
These are the methods that we should override in our model class. The ‘training_step’ method will be executed for each training batch and the returned loss from this method will be back propagated through the model. The ‘validation_step’ method is executed for each validation batch. The ‘configure_optimizers’ method should return the optimizer used in training the model.
Even with a small model, we can see that the PyTorch Lightning training script has followed a clean coding style and avoided unnecessary boilerplate code. This directly results in a more readable code with fewer bugs. Now that we have followed the PyTorch Lightning format, we can easily add advanced features to our code by setting some flags while we initialize the ‘Trainer’.
Migrating From PyTorch to PyTorch Lightning
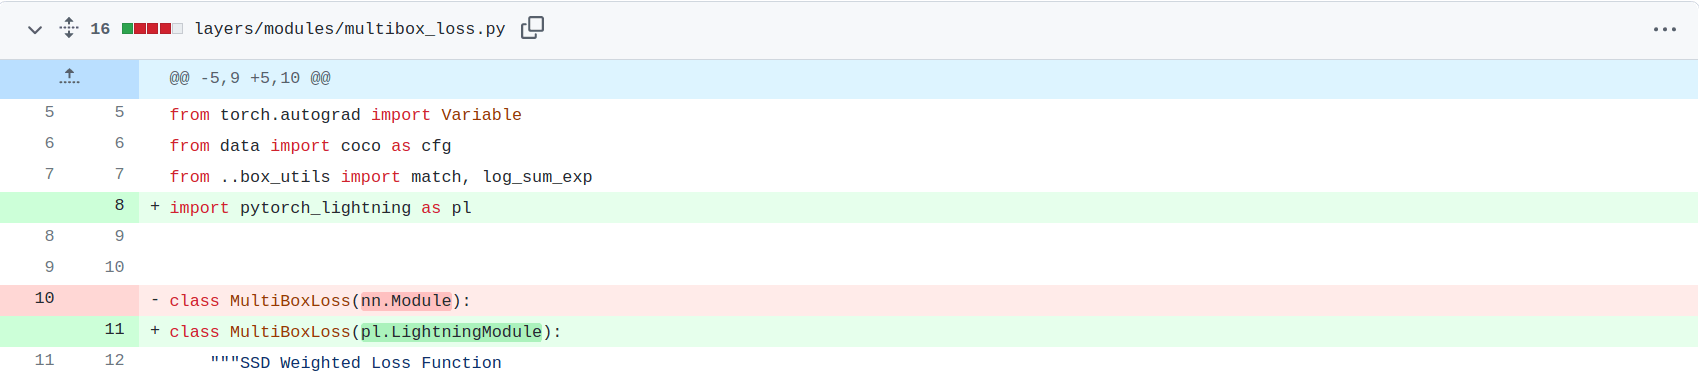
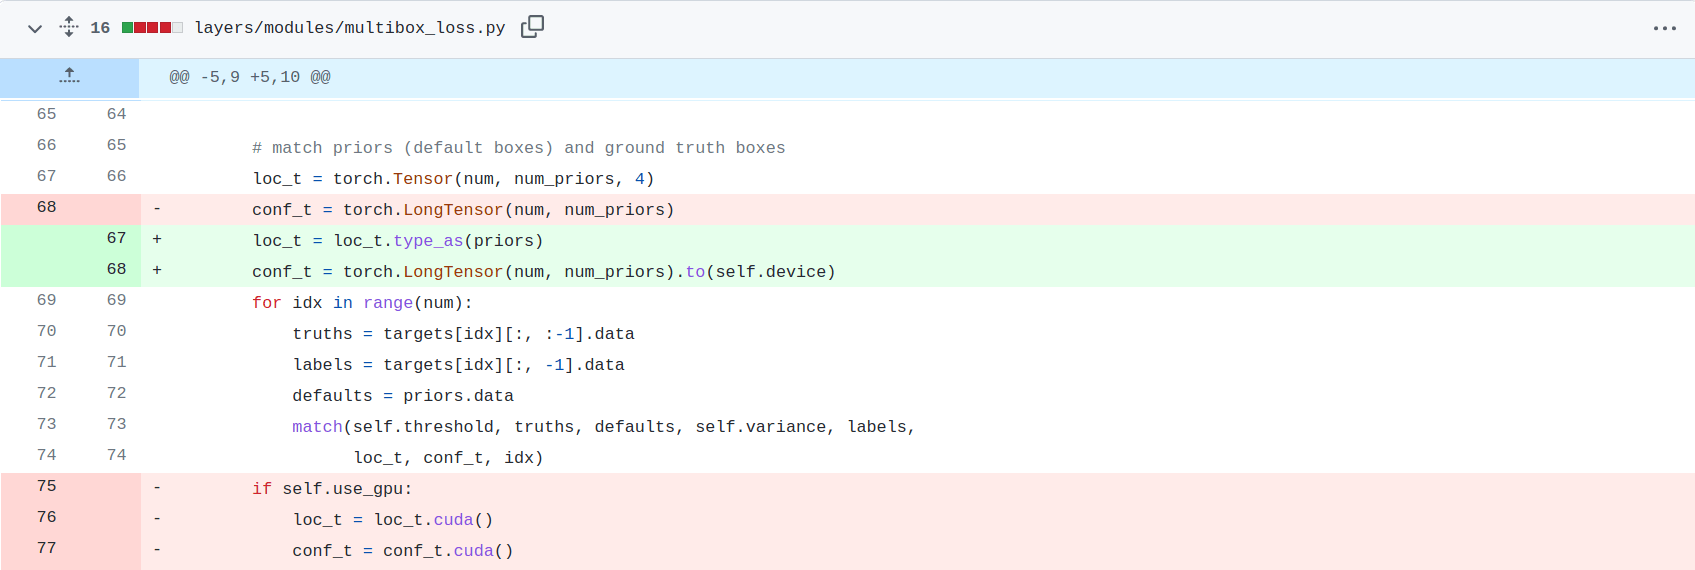
We can create a PyTorch Lightning model from scratch or convert an existing PyTorch model into the PyTorch Lightning format. We used this repository (a PyTorch implementation of Single Shot Multibox detector) in one of our projects to train an object detection model. We converted this PyTorch model to a Lightning model with little effort and could make use of all the features Lightning has to offer.
This is how we can convert a PyTorch model to a PyTorch Lightning model.
- PyTorch Lightning Modules were inherited from pytorch_lightning.LightningModule and not from torch.nn.Module.
2. We removed all .to(device) or .cuda() calls except when necessary.

3. All training code was organized into Lightning module.

4. Data hooks were used to load data.

5. The learning rate scheduler was added.

With these changes, we converted our PyTorch code to the PyTorch Lightning module. Now we can use the Trainer to start training and use the trainer flags to access the features of PyTorch Lightning.

You can find the complete PyTorch Lightning SSD code here.
Conclusion
PyTorch Lightning eases the process of creating better PyTorch training pipelines. Even though it has a little performance overhead over PyTorch and a small learning curve, the features it provides out of the box make it worthwhile.