Cloud Development Kit (CDK), an Infrastructure as Code (IaC) framework, lets you define cloud resources using your favorite programming language and create CloudFormation (declarative programming model based on JSON or YAML files) template out of it. This means you can get started quickly if you have work experience in AWS and proficiency in any of the programming languages like TypeScript, Python, C#, or Java.
Hang on and I'll show you in a bit how quickly you can create and deploy a CDK app.
But first, a look at some of AWS CDK's advantages:
- To my mind, the number one advantage is that we don't need to learn any template (CloudFormation) or configuration (HCL for Terraform) languages. The CDK code gets automatically converted to CloudFormation template.
- You will be writing fewer lines of code compared to CloudFormation. For example, to create an S3 bucket and attach a bucket policy using CloudFormation, it will take more than 100 lines of code. In CDK, it will take just 50 lines.
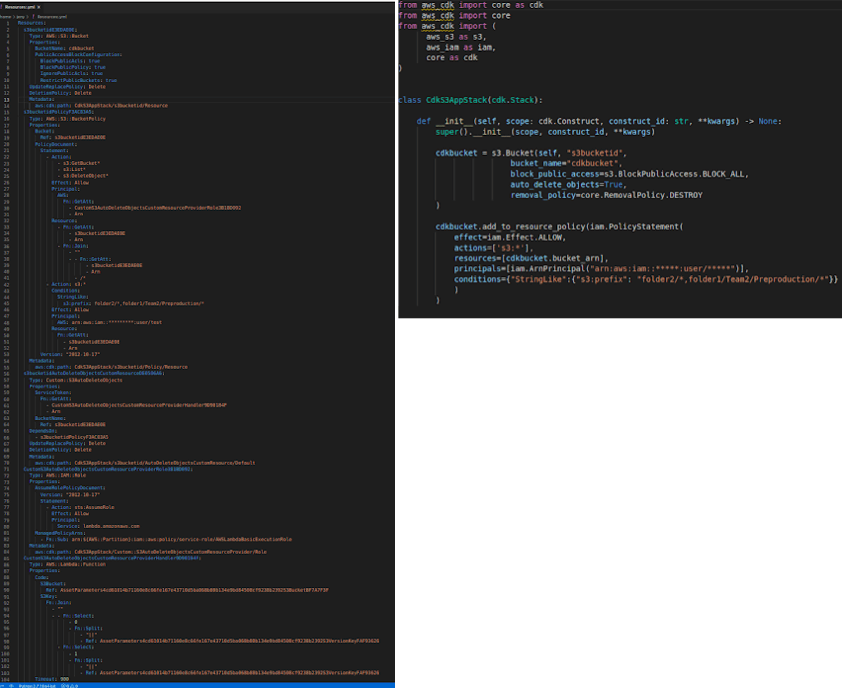
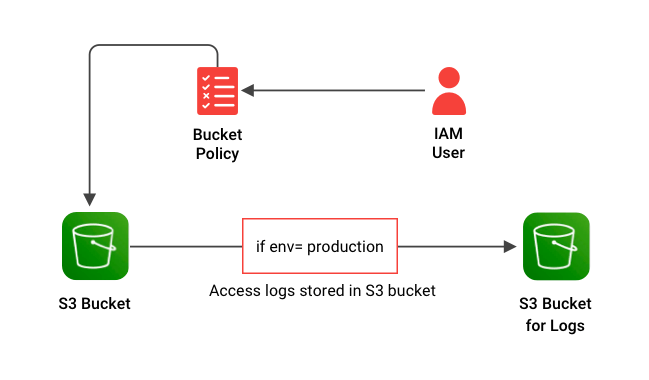
- The CDK code can be easily modularized and shared across projects. It supports the use of classes, if statements, for loops, etc. For example, while creating an S3 bucket, we can easily make use of the if-else condition to enable logging feature as shown below.
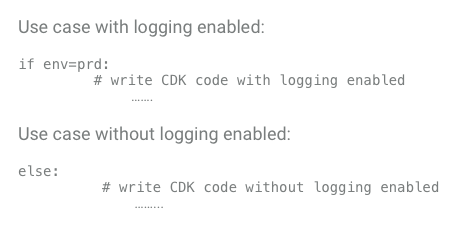
Note: We will learn more about "Server Access Logging" property in a later section on S3 Bucket Construct.
CDK Application Development Workflow
Here is a high-level workflow of a CDK application. We will discuss the steps one by one in later sections.
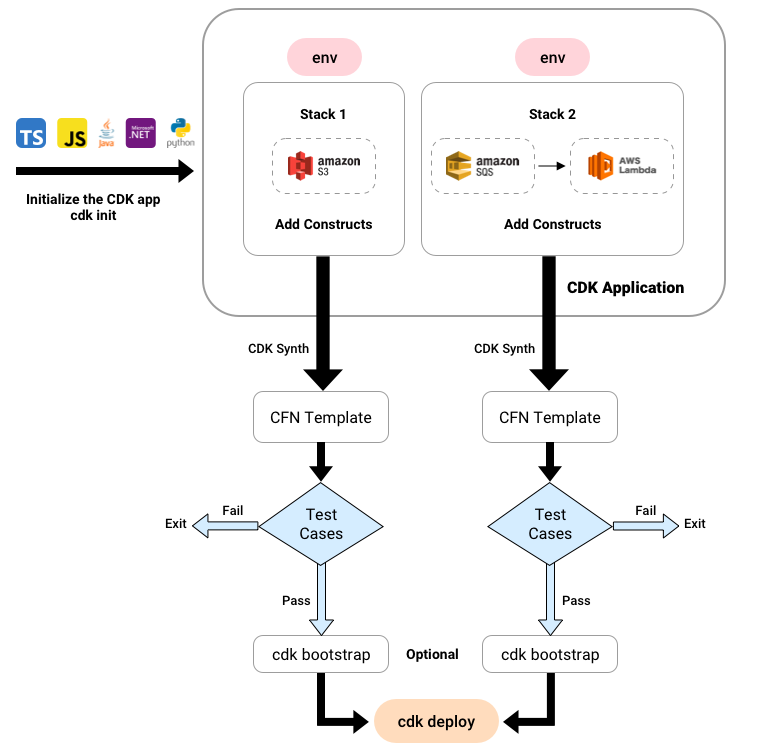
Every AWS resource that you create using CDK should be defined inside the scope of a stack (unit of deployment in CDK). A CDK application is a collection of related stacks. Equally important are constructs or reusable cloud components. Constructs can represent a single AWS resource or be a higher-level abstraction consisting of multiple AWS resources (Check the AWS CDK Construct Library for the full list of ready-to-use constructs).
Initialize CDK App
Let's create a simple CDK app with a single stack. We will be adding a construct for an Amazon S3 bucket with some of its basic properties enabled. The programming language I'm going to use is Python.
You can set up the development environment for writing the CDK app using this developer guide.
Our app should be present inside its own directory. So create an empty directory and initialize the app as shown below. Use the cdk init command, specifying the language you are going to use.
cdk init app --language python
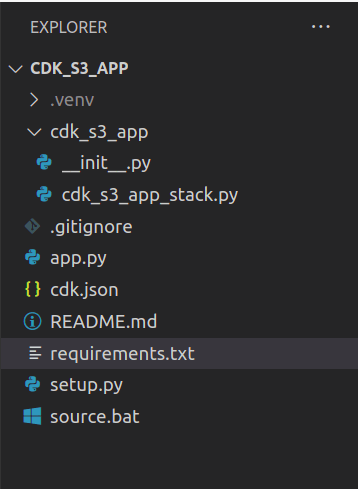
A set of files and folders get created inside the app’s directory. We will write our CDK code inside those files.
Instantiate the Stack
In the files/folders list inside the cdk directory, you can see app.py, which is the entry point of our CDK application. There we can create an app object as shown below:
app = cdk.App()
We pass this app object along with a couple of other parameters while instantiating the stack. We can also connect our stack with its corresponding target environment. To do that, set the env property as shown below:
env_s3=core.Environment(account=”***”, region=”***”)
Likewise, we can assign multiple stacks to multiple environments. Specify the environment to which you are going to deploy the stack by using the env parameter while instantiating the stack. The first parameter is the app construct and the second is the stack name. I’m going to name this stack CdkS3AppStack.
CdkS3AppStack(app, “CdkS3AppStack”,env=env_s3)
If we do not specify any env property, the CDK will use the AWS CLI profile and deploy the resources to that account.
Add the Constructs
Look for a file named cdk_s3_app_stack.py, which was created when we applied the init command earlier. A class named CdkS3AppStack with an init method is already present inside the file. We need to add our respective constructs to it.
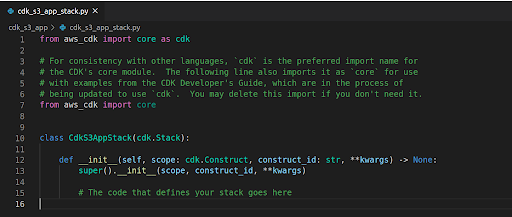
Constructs are added based on the use case and the resources we intend to deploy. Install all the dependencies and packages using the pip command. In this context, we need the CDK constructs for S3 and IAM resources. Import those packages and the CDK core module.
from aws_cdk import core
from aws_cdk import (
        aws_s3 as s3,
        aws_iam as iam
)
All constructs accept certain parameters such as:
- Scope: self in Python
- Id: Logical id of our resource
- Props: Properties of the resource
S3 Bucket Construct: The CDK Construct Library has a module aws-s3 that represents S3 service.
Define the S3 bucket using the Bucket construct.
cdkbucket = s3.Bucket(self, logical_id,
                       bucket_name=bucket_name,
                       block_public_access=s3.BlockPublicAccess.BLOCK_ALL,
                       server_access_logs_bucket=server_access_logs_bucket,
                       server_access_logs_prefix=server_access_logs_prefix,
                       auto_delete_objects=True,
                       removal_policy=core.RemovalPolicy.DESTROY)
As we can see from the above code, the Bucket construct takes a bunch of parameters such as bucket_name, block_public_access, server_access_logs_bucket, server_access_logs_prefix, auto_delete_objects, and removal_policy. The first two parameters indicate the scope and logical_id respectively. The logical_id uniquely identifies our AWS resource. All the other parameters are different properties. You can omit them if you don't want to set them for your bucket.
Let's take a look at a few of these properties. Server Access Logging is enabled in S3 buckets in CDK using the property server_access_logs_bucket (bucket where the server logs are to be stored) and server_access_logs_prefix (prefix under which the logs are to be stored in the logging bucket).
We can use conditional statements (if-else) to enable or disable logging. To track the server logs, pass the log bucket object name, else pass ‘None’ to the ‘server_access_logs_bucket’ property. We can also add a LifecycleRule to manage the logs as shown below.
Here the lifecycle rule is applied to all the files coming under the prefix: “logbucket_server_access_logs_prefix”.
lifecycle_rules= [{
      "prefix": logbucket_server_access_logs_prefix,
      "transitions": [{
        "storageClass": s3.StorageClass.GLACIER,
        "transitionAfter": core.Duration.days(retentiondays)
      }]
}]
We will discuss auto_delete_objects property and removal_policy in a later section on deleting the stack.
Add Bucket Policy
To grant permission for other AWS accounts or IAM users to access the S3 bucket, create a bucket policy and attach it. Use add_to_resource_policy to attach a policy to the S3 bucket.
cdkbucket.add_to_resource_policy(iam.PolicyStatement(
    effect=iam_effect,
    actions=s3_actions,
    resources=[cdkbucket.bucket_arn],
    principals=[iam_principal],
    conditions={"StringLike":{"s3:prefix": bucket_conditions}}
    )
)
Tagging
Use tags to identify and categorize the AWS resources in the CDK application.
from aws_cdk import core
core.Tags.of(stack_name).add("key", "value")
Tags are key-value pairs. They can be applied at the stack level also so that all the resources associated with the stack get tagged.
Generate the CloudFormation Template
CDK internally generates a CloudFormation template. Try the below command and see the magic.
cdk synth
A folder called cdk.out gets created and the CFN template based on the written stack is generated inside that folder. We managed to do this without learning any template language or manually writing 100 lines of code!
Test Your Template
For testing, you can make use of unit testing frameworks (unittest) and assert methods like assertEqual (actual_template, expected_template). Different test cases are possible, such as comparison of generated template with the expected template, comparison of generated and expected list of resources, property check for each resource created by CDK app, etc.
Deploy the CDK App
Once you have made sure that all the intended resources are present in the CloudFormation template and all the test cases are passed, you can go ahead and deploy the application.
Note: If you use any assets (artifacts the CDK app needs to operate, such as docker images, lambda handler code, etc.) in your stack or if the CloudFormation template generated by your app exceeds 50 kilobytes, you need to execute the bootstrap command cdk bootstrap.
Bootstrapping is usually done to provision the resources CDK requires to perform the deployment. Since we have not used any assets in our case, we can directly deploy our stack.
cdk deploy
CDK supports passing custom values during deployment time, which can then be used as properties in the stack constructs you create. For that, you need to use the parameters flag.
We can pass multiple parameters:
cdk deploy --parameters parameter1=parameter_value1 --parameters parameter2=parameter_value2
You can see the S3 bucket associated with the stack created in your AWS account. Make sure that the properties you set are updated in the account.
Deleting the Stack
You can delete the stack either through the CloudFormation console or by using the cdk toolkit command:
cdk destroy
What happens to the resources when we delete our CDK stack? Will they also get deleted? The answer is not always a yes. Some of the AWS resources that maintain persistent data such as databases, S3 buckets, etc., have a removal_policy. If we delete the stack, our S3 bucket gets orphaned from the stack and will remain in the AWS account. If you want to delete all the resources associated with a stack, you must set the ‘removal_policy’ to DESTROY’. But before deleting the bucket, make sure you delete all the objects inside it by setting the ‘auto_delete_objects property’ as TRUE.
Conclusion
We have now covered some of the basic concepts of AWS CDK and run through the exercise of creating a bucket in S3. You can use this as the basis for building your own AWS CDK stack(s). Also, have a look at a few sample codes in the aws-cdk-examples GitHub repo.

