


The 6 Steps to Transfer Reports from Oracle NetSuite to SFTP Server
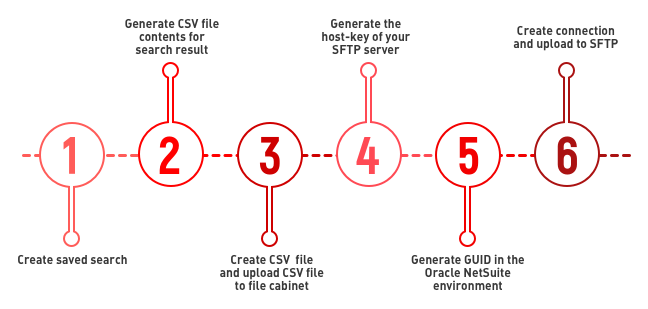
1. Create Saved Search
Search can be created in SuiteScript 2.0 using the search module. It can be done using search.create API, where type indicates the record to be searched. Record types can be filtered using search.createFilter and the required field values from those records can be retrieved using search.createColumn. Finally, search can be executed using run() method on the search object. A sample code snippet to create saved search is given below.define(['N/record', 'N/search'],
function(record, search) {
function execute(scriptContext) {
var customersearch = search.create({
type: "invoice",
filters: [
search.createFilter(
{
name: 'entity',
operator: 'anyof',
values:500
}),
],
columns: [
search.createColumn({
name: "internalid",
sort: search.Sort.ASC
}),
]
});
var customersearchres = customersearch.run().getRange(0, 1000);
}
return {
execute: execute
};
});
2. Generate CSV File Content for Search Result
Next, we generate the CSV file. A sample code snippet to generate CSV file is given below:function createcsvcontent(columns,firstsearchResult) {
//Creating arrays that will populate results
var content = new Array();
var headers = new Array();
var temp = new Array();
var x = 0;
for(var i=0; i< columns.length; i++)
{
headers[i] = columns[i].label;
}
content[x] = headers;
x =1;
for(var i=0;i<firstsearchResult.length;i++)
{
var result = firstsearchResult[i];
for(var y=0; y< columns.length; y++){
if(result.getText(columns[y])!=''&&result.getText(columns[y])!=' '&&result.getText(columns[y])!=null)
{
var searchResult = result.getText(columns[y]);
if(searchResult!=null)
{
searchResult = searchResult.toString().replace("undefined", "");
searchResult = searchResult.toString().replace("false", "No");
searchResult = searchResult.toString().replace("true", "Yes");
}
temp[y] = searchResult;
}
else
{
var searchResult = result.getValue(columns[y]);
if(searchResult!=null)
{
searchResult = searchResult.toString().replace("undefined", "");
searchResult = searchResult.toString().replace("false", "No");
searchResult = searchResult.toString().replace("true", "Yes");
temp[y] = searchResult;
}//searchResult!=null
}//else
} //y
content[x] +=temp;
x++;
}//i
var contents='';
for(var z =0; z<content.length;z++){
contents +=content[z].toString() + '\n';
}
log.debug('contents before',contents);
if(contents!='')
{
contents = contents.toString().replace(/undefined/g, "");
contents = contents.toString().replace(/’/g,'');
}
log.debug('contents after',contents);
return contents;
}
The columns indicate the search columns produced in step 1 and firstsearchResult indicates the resultant array. Columns array can be used to read the labels first so that they can be placed at the header of the CSV file. The resultant array is then read to get the required values and they are added to the rows below the header in the CSV file.
3. Create CSV File and Upload to File Cabinet
This step is used to create the CSV file using the content generated in the previous step. Sample code snippet:function createcsvfile(start_name,contents) {
var file_date = new Date();
file_date.setDate(file_date.getDate()-1);
var file_dd = file_date.getDate();
if(file_dd<10)
{
file_dd = '0'+file_dd;
}
var file_mm = file_date.getMonth();
file_mm++;
if(file_mm<10)
{
file_mm = '0'+file_mm;
}
var file_yy = file_date.getFullYear()-2000;
file_yy = parseFloat(file_yy).toFixed(0);
var final_file_name = start_name+file_mm+file_dd+file_yy;//start_name+file_dd+file_mm+file_yy;
var id = 0;
try
{
var fileObj = file.create({
name: final_file_name+'.csv',
fileType: file.Type.CSV,
contents: contents,
encoding: file.Encoding.UTF8,
//description: 'This is description',
folder: folderid//SFTP CSV
});
id = fileObj.save();
// log.debug('id',id );
}
catch (e) { // incase the folder is not present
var fileObj = file.create({
name: final_file_name+'.csv',
fileType: file.Type.CSV,
contents: contents,
encoding: file.Encoding.UTF8,
});
id = fileObj.save();
// TODO: handle exception
}
return id;
}
The start_name indicates the prefix to be added in the file name and contents indicate the file content generated in the previous step. The CSV file is then created using the file module API file.create and it is placed in the file cabinet folder indicated by folder parameter.
4. Generate the Host-Key of SFTP Server
You can get your SFTP server’s host key by using the following command: Ssh-keyscan hostname or IP address5. Generate GUID in Oracle NetSuite Environment
GUID stands for Global Unique Identifier. This is a unique identifier generated in Oracle NetSuite by a particular algorithm. You can use this algorithm to generate a GUID for a specific domain and script. A sample code snippet for generating a GUID is given below.define(['N/ui/serverWidget',N/log"],
function (serverWidget, log) {
function onRequest(context) {
if (context.request.method === 'GET') {
var form = serverWidget.createForm({
title: 'Guid Form’
});
form.addField({
id: 'username',
type: serverWidget.FieldType.TEXT,
label: 'Username'
});
form.addCredentialField({
id: 'password',
label: 'Password',
restrictToScriptIds: 'customscript_id, //id of Script Using sftp
restrictToDomains: ‘domain name'
});
form.addSubmitButton({
label: 'Submit Button'
});
context.response.writePage(form);
return;
} else {
var requset = context.request;
var myPwdGuid = requset.parameters.password;
log.debug("myPwdGuid", myPwdGuid);
context.response.write(myPwdGuid);
}
}
return {
onRequest: onRequest
};
});
6. Create Connection and Upload to SFTP
In the final step, we create the connection to the SFTP server using its username, password, url, password GUID, hostkey, and port. Once the connection is established, the file generated via the previous steps is uploaded to the SFTP server.function upload_to_sftp(fileId) {
var connection = sftp.createConnection({
username: username,
passwordGuid: pwdguid,
url: sftpurl,
hostKey: hostkey,
port : 22
});
log.debug({title: 'DEBUG', details : 'connection : '+connection});
if(connection)
{
var fileObj = file.load({id: fileId});
log.debug({title: 'DEBUG', details : 'UPLOAD FILE : '+fileObj });
connection.upload({
//directory: '/',
directory: directory,
file: fileObj,
replaceExisting: true
});
log.debug({title: 'DEBUG', details : 'MOVED FILE : '+fileObj });
}//connection
}//upload_to_sftp function