

This post is for anyone who’s trying to implement Public Key Info Hash SSL Pinning in iOS using TrustKit. The process is very straightforward except when you goof up by missing a tiny detail. A lot of documentation is already available on this topic. I’m just bringing the whole process under one roof.
What Is SSL Pinning?
SSL pinning is a mechanism that is used to enhance app security. It helps mitigate man-in-the-middle attacks by validating the certificate or the public key pin of the host. We “pin” the host using its certificate or public key. All requests that are not associated with the certificate (or the public key) are rejected.
There are two major types of pinning—Certificate Pinning and Public Key Pinning. Certificate Pinning is more easily done but requires the app to be updated once the certificate expires. Alamofire Library for iPhone supports Certificate Pinning. Public Key Pinning, on the other hand, has more varieties and allows more flexibility but is trickier to implement due to the extra steps required to extract the public key information from the certificate itself.
Here we’ll look at how to pin the base64-encoded SHA-256 of a certificate's Subject Public Key Info using TrustKit. We’ll go through the installation process in detail. Towards the end of the post, I’ve provided details of the tool that you can use to verify if the pinning is set correctly for your app.
Let's Get Started...
The first step is very simple. Integrate TrustKit in your project. The recommended method is through CocoaPods.
Add the following line to your Podfile:
pod 'TrustKit'
Then run the following command:
$ pod install
Now that we have the library in place, let’s follow the TrustKit documentation to enable SSL Pinning for our project.
Create a new Swift file. I’m going to call mine Security.swift. This is where we store all the security-related code.
Import TrustKit and add the TrustKit code to this file. The file would look something like this:
import Foundation
import TrustKit

class Security: NSObject {
    static let publickKeyHash = "your public key hash here"
    static let backupPublickKeyHash = "your backup public key hash here"

    class func startSSLPinning() {
        let trustKitConfig = [
            kTSKSwizzleNetworkDelegates: false,
            kTSKPinnedDomains: [
                "yourDomainName.com": [
                    kTSKIncludeSubdomains: true,
                    kTSKEnforcePinning: true,
                    kTSKPublicKeyHashes: [
                        publickKeyHash,
                        backupPublickKeyHash
                    ],]]] as [String : Any]

        TrustKit.initSharedInstance(withConfiguration:trustKitConfig)
    }
}
You might have noticed the placeholder values — these are items that you’ll need to fill in. How? Pretty simple.
yourDomainName.com should have the domain that you’re trying to pin (for example, apple.com). Set the key kTSKIncludeSubdomains to true to ensure that all subdomains are also pinned (for example, developer.apple.com).
Now, to get the public key hash, you have two methods: the long one and the short one. You can use the short method to quickly find the keys to be added. Go for the long method to verify the keys that you’ve added, just for your satisfaction.
The Short Method
Go to SSL Labs and enter the domain name (for example, apple.com) and click Submit. You’ll see a lot of certificates and their related info.
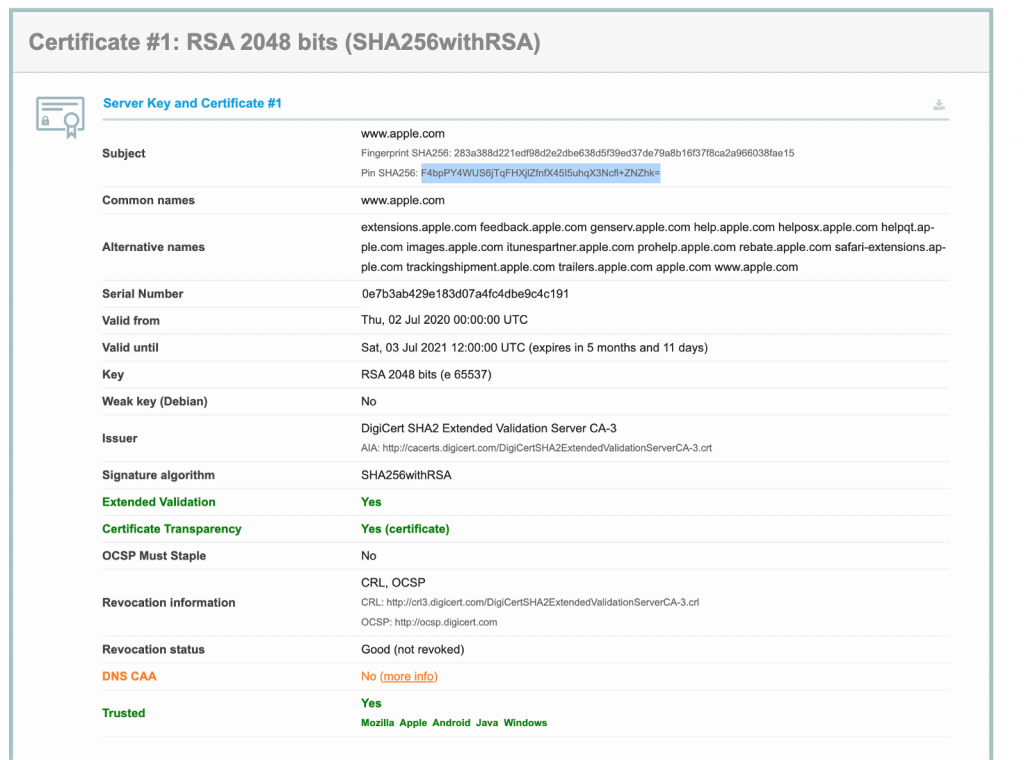
That highlighted bit of info stated as "Pin SHA256" is what you want. It ends with a “=” symbol. This is what you’ll need to paste in your Security.swift file in the place of your public key hash here.
If you search on the page, you’ll find a lot of public key hashes.
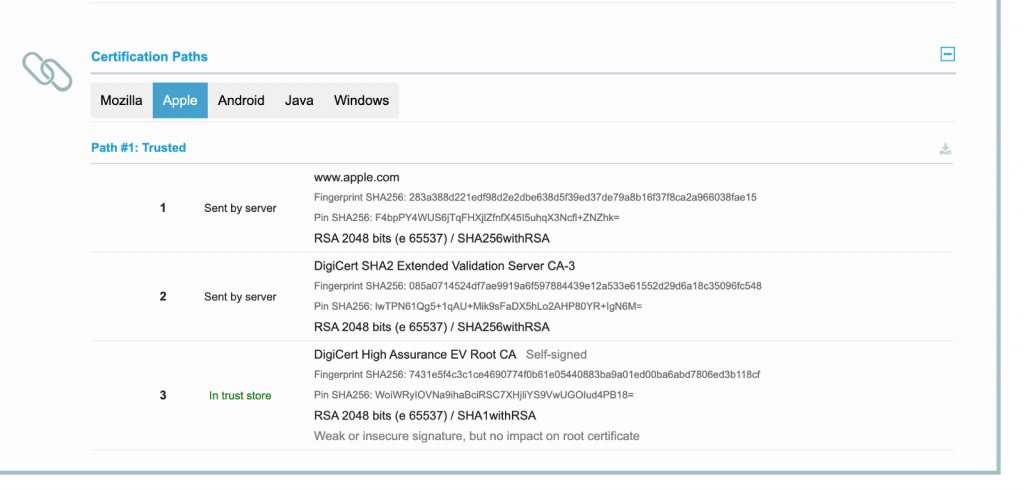
So which one to use? This is where you use the long method.
The Long Method
For this, you’ll require the certificate of the domain. It’s a .crt file that you have to obtain from the client or the domain owner. We’ll generate the public key hash using this .crt file and verify it on SSL Labs website.
Once you have the .crt file, download it into a folder. In the command line, go to the folder where the file is downloaded and paste the following:
openssl x509 -in my-certificate.crt -pubkey -noout | openssl pkey -pubin -outform der | openssl dgst -sha256 -binary | openssl enc -base64
Replace my-certificate.crt with the file name that you’ve downloaded. Press Enter and you’ll be able to see the public key hash with the “=” at the end. Copy the key and verify it by searching for that string on SSLLabs site.
For TrustKit, you need to provide two keys in the code, so you’ll need one more Public Key hash, preferably of the root certificate. This can be obtained from SSLLabs or if the client has provided the .crt file, you can generate the key using the above method.
Now that you have the hash key values, paste them in the Security.swift file. Now to enable pinning, add the following line inside your appDelegate’s didFinishLaunchingWithOptions method:
Security.startSSLPinning()
Now the pinning code is set. Now we need to add the pinning validator code. The Objective C code as per TrustKit documentation is given below.
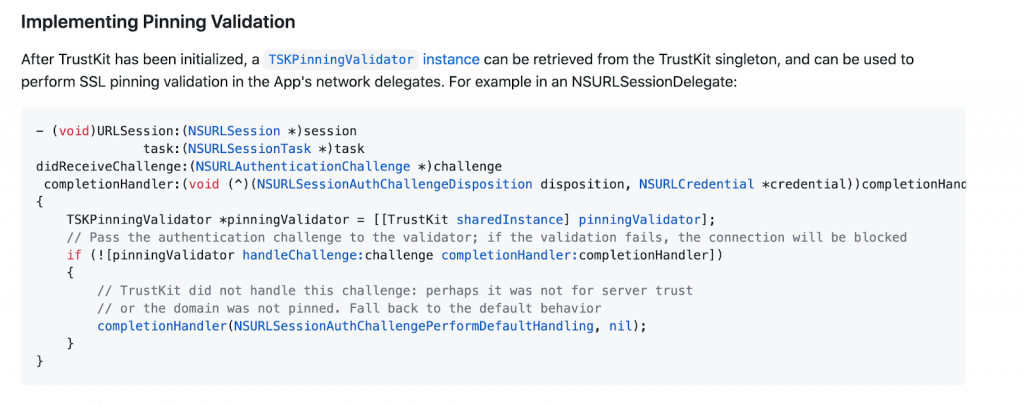
You need to add the following bit of code inside the NSURLSessionDelegate method (URLSession:task:didReceiveChallenge:completionHandler:). This is the equivalent Swift code for the above.
func urlSession(_ session: URLSession,
                         task: URLSessionTask,
                         didReceive challenge: URLAuthenticationChallenge,
                         completionHandler: @escaping (URLSession.AuthChallengeDisposition, URLCredential?) -> Void) {
         // Call into TrustKit here to do pinning validation
         if TrustKit.sharedInstance().pinningValidator.handle(challenge, completionHandler: completionHandler) == false {
             // TrustKit did not handle this challenge: perhaps it was not for server trust
             // or the domain was not pinned. Fall back to the default behavior
             completionHandler(.performDefaultHandling, nil)
         }
     }
This seems pretty simple enough, but if you, like me, have a Base API class, then chances are you might not be able to access this particular delegate method. If you are able to access it, well and good. If not, you might need to implement a custom SessionDelegate class to access this delegate method.
IMPORTANT: The next step is required only if you’re not able to access the above delegate method in your base class where you are implementing the session handling.
So in my code, I had to create a custom SessionDelegate class so as to access this required session delegate method:
class CustomSessionDelegate: SessionDelegate {

    override func urlSession(_ session: URLSession,
                         task: URLSessionTask,
                         didReceive challenge: URLAuthenticationChallenge,
                         completionHandler: @escaping (URLSession.AuthChallengeDisposition, URLCredential?) -> Void) {
         // Call into TrustKit here to do pinning validation
         if TrustKit.sharedInstance().pinningValidator.handle(challenge, completionHandler: completionHandler) == false {
             // TrustKit did not handle this challenge: perhaps it was not for server trust
             // or the domain was not pinned. Fall back to the default behavior
             completionHandler(.performDefaultHandling, nil)
         }
     }
}
This is how I created my session:
var session = Session(delegate:CustomSessionDelegate(), eventMonitors:[customEvenitMonitor()]
As you can see, my session is getting assigned the CustomSessionDelegate because the eventMonitor class DOES NOT have the above required delegate accessible from it. Hence for me, this particular session delegate method was not available to implement the TrustKit code (hence all this noise about Custom Session Delegate!). I’m sure for all other cases, you don’t need to implement this. But if you DO get stuck, this should help.
Alright , so our development is complete! Make sure that when an API call is fired, you get a call inside this SessionDelegate method (URLSession:task:didReceiveChallenge:completionHandler:) where we’ve implemented the TrustKit checking.
Testing SSL Pinning Using Burp Suite
Now that we’ve completed the development required for SSL Pinning, it's time to test it. You can test your app using Burp Suite Mac (the instructions for that are here) and you’ll get a fool-proof SSL Pinned code ready to ship!