
Hard bounces can be frustrating to deal with, more so if you are new to Salesforce Marketing Cloud. But you must deal with them swiftly before they hurt your sender reputation or deliverability rate.
Hard bounces or permanent delivery failure can happen with addresses that are invalid or non-existent. Internet Service Providers (ISPs) can also reject emails that trigger or fail any of their security filters or checks. Though not as bad as hard bounces, soft bounces (or temporary delivery failure) can harm your reputation if they happen too often. Repeated delivery attempts can signal to the service provider that your emails are unsolicited or improperly managed, which can lead to your future emails being marked as spam or your domain being blacklisted.
You can reduce the bounce rate significantly by suppressing or excluding the bounced addresses from your mailing list. Tackling addresses one by one is not an option because, who are we kidding here, there could be hundreds and thousands of them!
Executing Auto-Suppression in Salesforce Marketing Cloud
Salesforce Marketing Cloud (SFMC) offers powerful features to manage suppression lists, ensuring that emails are not sent to unsubscribed or invalid or spam addresses. By automatically excluding bounced addresses from your future campaigns, you can focus your efforts on those who are highly likely to engage with your content, which in turn can boost your sender score and reputation.
SFMC helps you streamline suppression list management through tools such as Automation Studio and Journey Builder. Automation Studio can be configured to run scheduled queries that identify and move hard bounce records to suppression lists. Journey Builder can automate the process of managing subscriber statuses in real time, ensuring that hard bounces, unsubscribes, and spam complaints are immediately reflected in your suppression lists.
Here's a step-by-step guide for implementing an automated auto-suppression list within Salesforce Marketing Cloud.
Step 1: Create the Auto-Suppression List
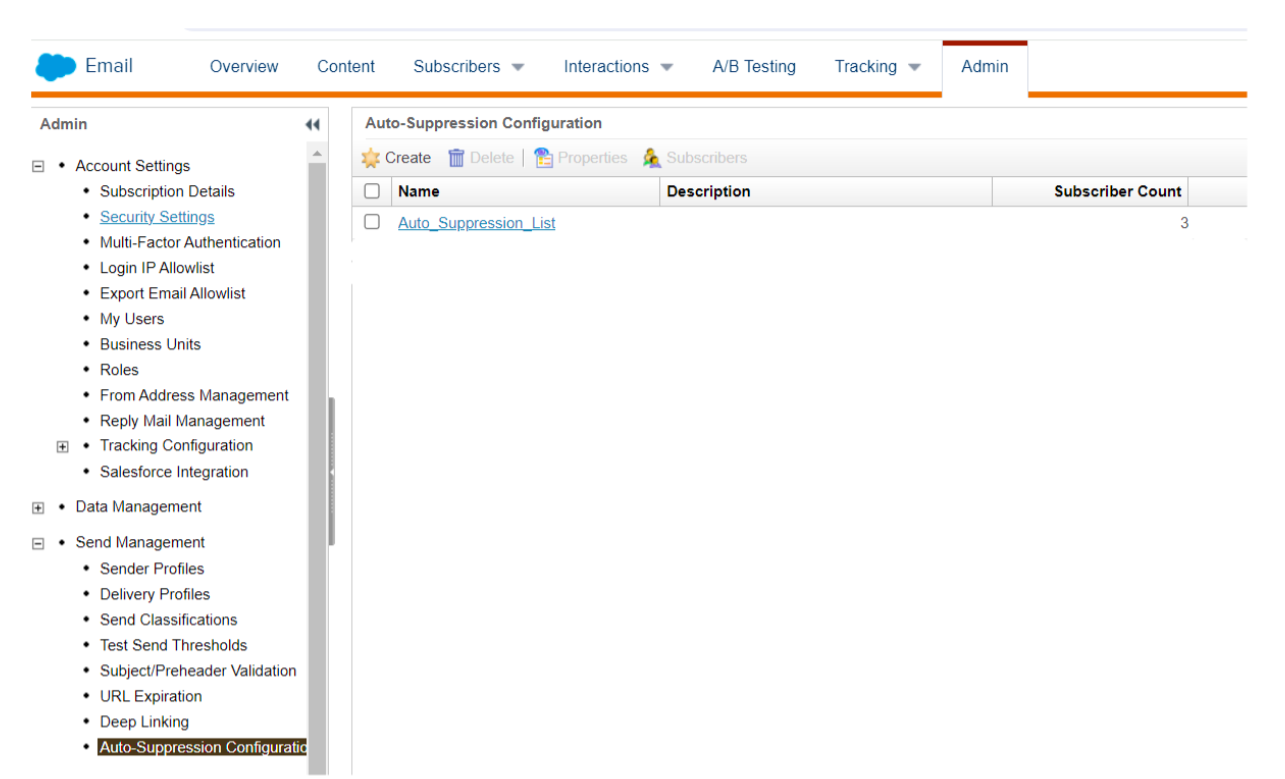
- In Email Studio, select the Admin tab in the primary navigation toolbar.
- Select Auto-Suppression Configuration under Send Management.
- Click Create.
- In the Properties section of the window that opens up, enter a name for your suppression list (a mandatory field).
- Fill in the fields in the Attributes section. Here, I have added the following fields: SubscriberKey (which will capture the unique value for every customer), EventDate (the date of the hard bounce), BounceCategory, and Bounce subcategory to capture more details of the customers I want to include in my do-not-contact list. Two attributes are defined by default: Email Address and Date Added. You can add or delete other attributes as needed.
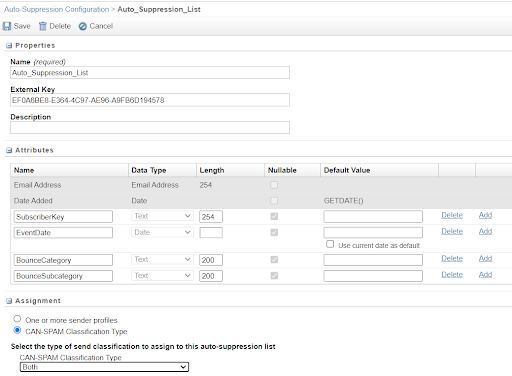
- In the Assignment section, choose either of the options given: One or more sender profiles (to manage the sender details for your emails and ensure they are consistent) or CAN-SPAM Classification Type (to help SFMC confirm the type of emails being sent). In this case, I have selected Both to ensure that both transactional and commercial emails comply with the CAN-SPAM Act. You can apply these settings to one or more business units, customizing suppression rules according to your organization's needs.
- Click Save.
Now, the template to capture the bounced subscriber data is ready. Next, let’s capture the required data.
Step 2: Create Target Data Extension
Next, let’s create a repository for storing the bounced data.
- In Email Studio, click Subscribers.
- Select Data Extensions from the drop-down menu.
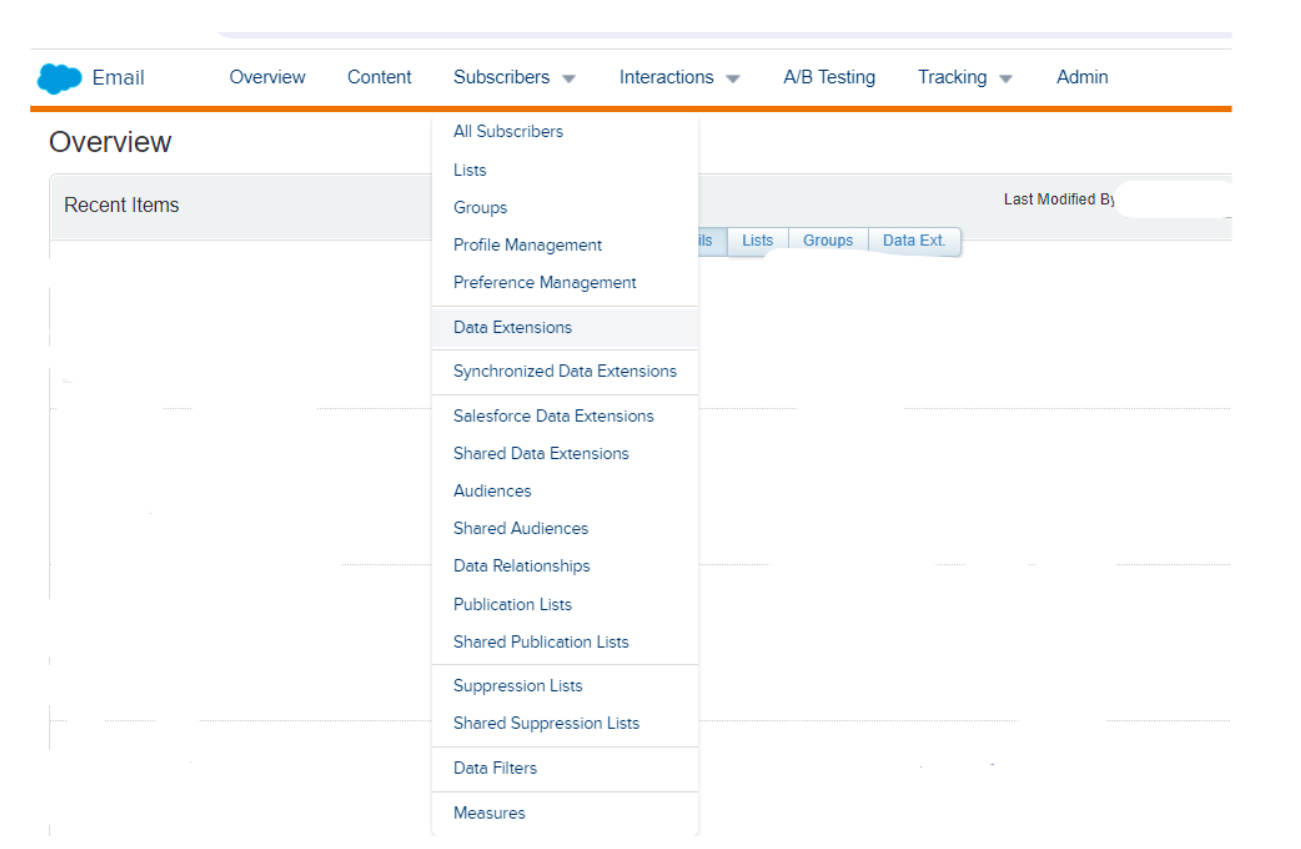
- Click Create and choose the Standard Data Extension option.
- In the Properties section, enter a name and description for the data extension.
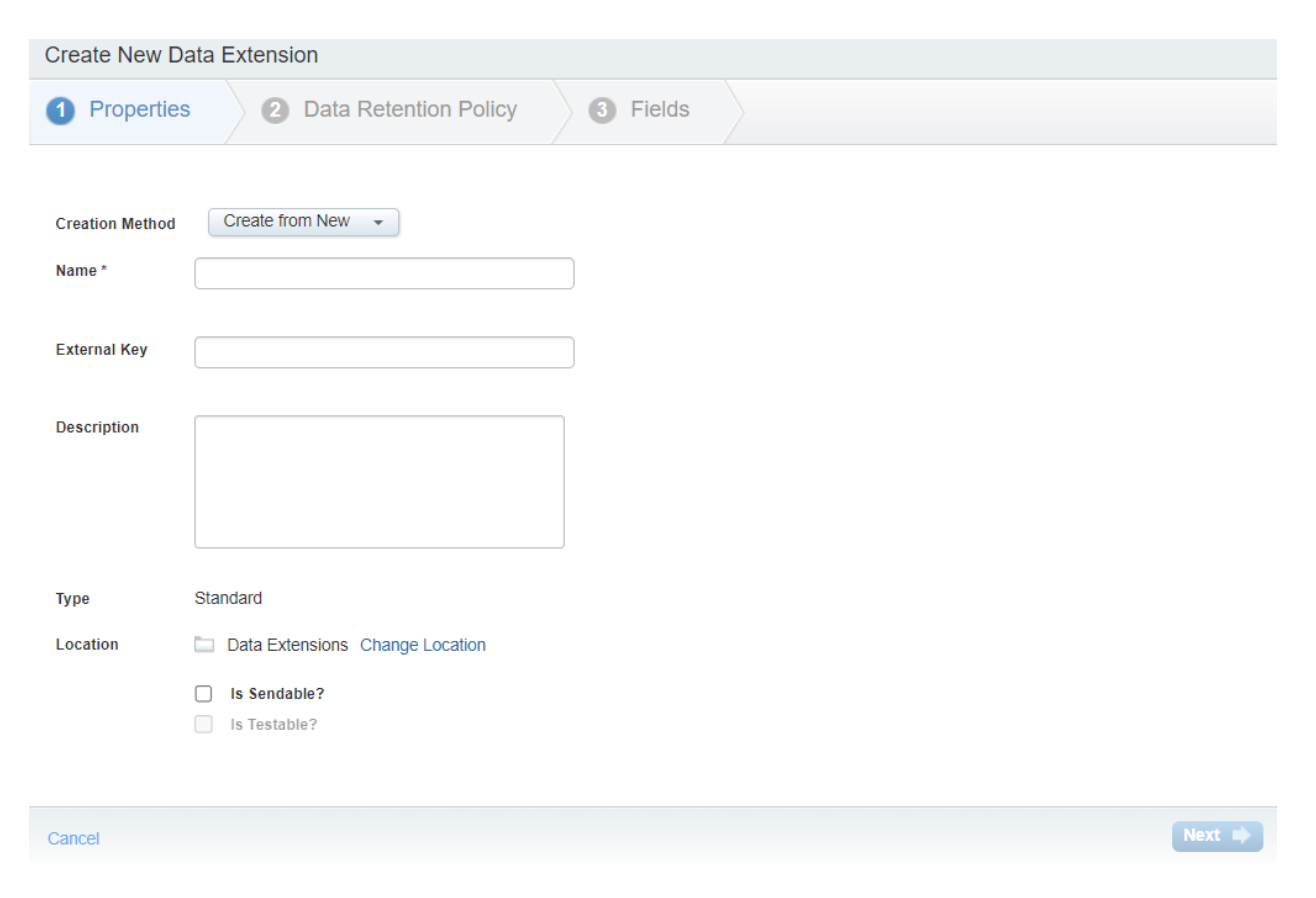
- Configure the retention settings in the Data Retention Policy section, if necessary, to define how long you want the data to be stored. This way, you won't store old or unnecessary data for too long, keeping your system clean and efficient.
- Click Next to proceed to the Fields section, where you can define the fields for your data extension.
- Add the same fields as those on the Auto-Suppression List to ensure seamless integration and data consistency. Use the Email Address field as the primary key to prevent duplicate records while making the rest of the fields nullable.
- Click Create. The data extension is now ready to capture the bounced records (see screenshot below).

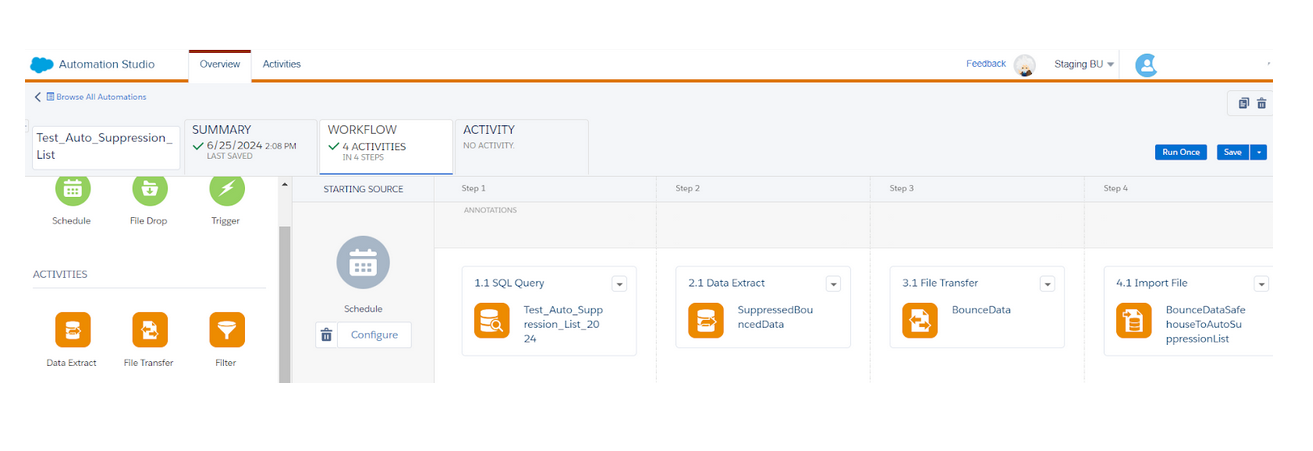
Step 3: Create Automation Workflow
Now let’s create the workflow to feed the bounce records to the auto-suppression list.
- Navigate to the Journey Builder tab in SFMC and select Automation Studio.
- Next, write an SQL query to fetch data where the Bounce Sub Category is 'User Unknown' or 'Inactive Account' within the last 30 days. If a longer time frame is needed, you can extend it to a maximum of 180 days.
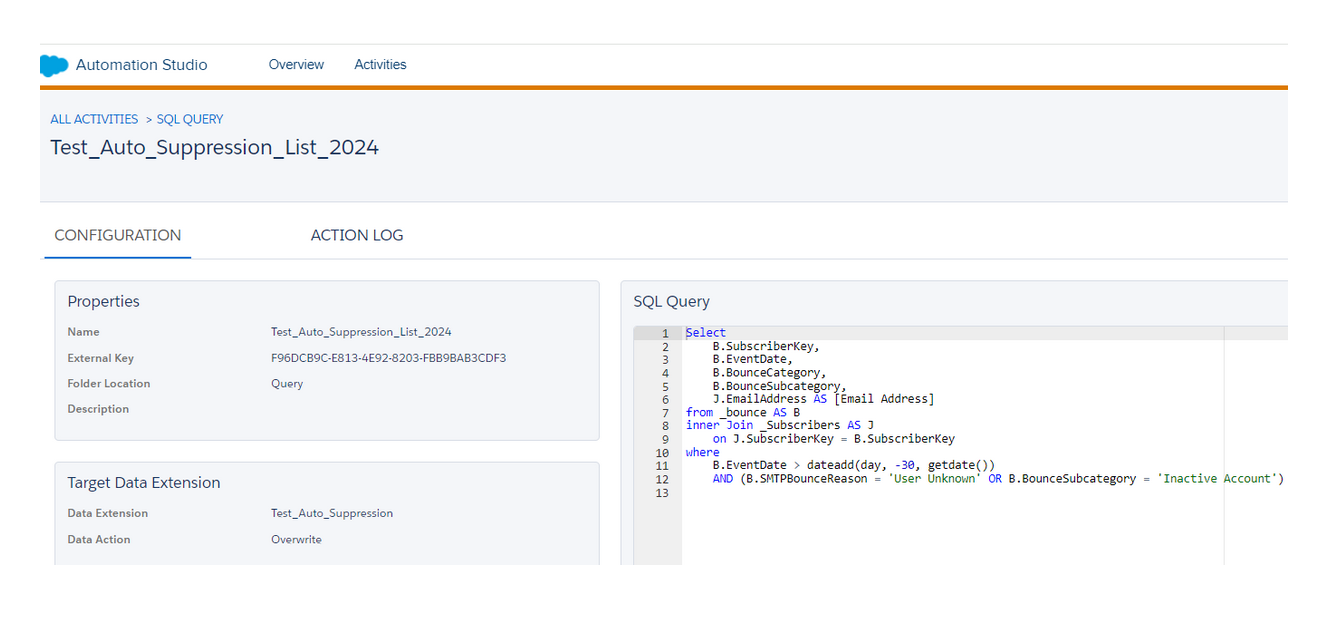
Let's explore the query you will use. This query gathers details such as SubscriberKey, EventDate, BounceCategory, BounceSubcategory, and EmailAddress from the bounce data view table. It combines this information with the Subscribers data view table using matching SubscriberKeys.
We are specifically looking at records where the EventDate is within the last 30 days and the BounceSubcategory is 'User Unknown' or 'Inactive Account'.
Select
    B.SubscriberKey,
    B.EventDate,
    B.BounceCategory,
    B.BounceSubcategory,
    J.EmailAddress
from _bounce AS B
inner Join _Subscribers AS J
    on J.SubscriberKey = B.SubscriberKey
where
    B.EventDate > dateadd(day, -30, getdate())
    AND (B.BounceSubcategory = 'User Unknown' OR B.BounceSubcategory = 'Inactive Account')
- Select the target data extension that you created in Step 2 to store the results of your SQL query. Make sure to select Overwrite Data Action, which will delete any existing data in the target data extension and replace it with the new data.
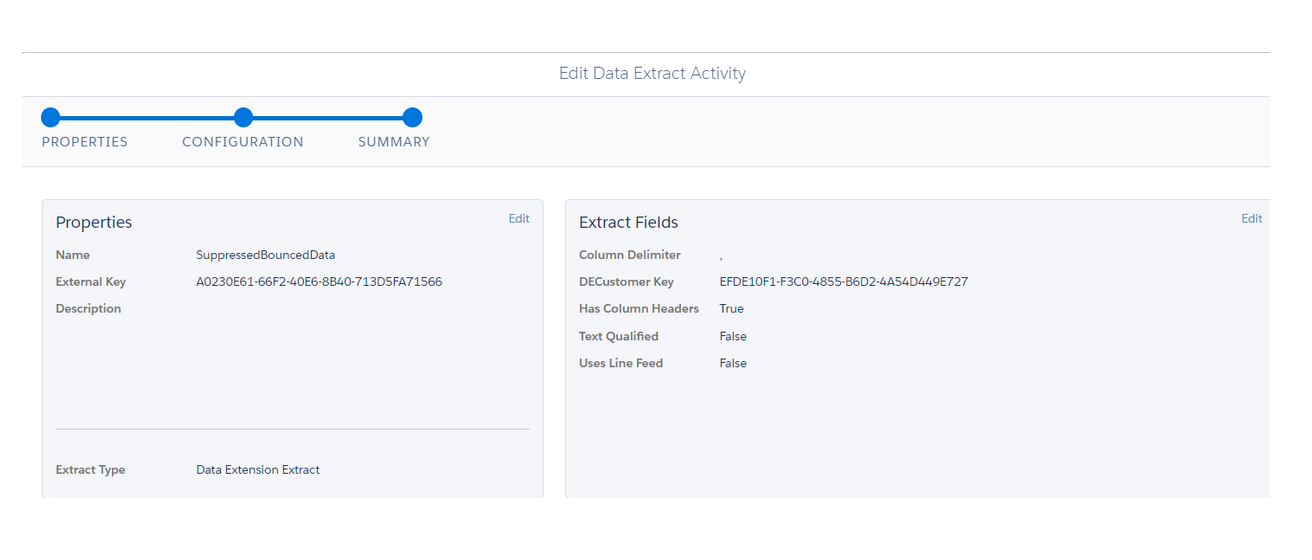
- Use Automation Studio's Data Extract Activity to send the extracted data from your Target Data Extension to a safehouse location in SFMC. Also, you can convert an XML file into a comma-delimited, tab-delimited, or pipe-delimited file for easy importing into your account.
- To transfer data from the Safehouse to an FTP location, use the File Transfer Activity. Choose the Move a File from Safehouse option to initiate the transfer from Marketing Cloud’s secure file transfer location to your designated FTP spot.
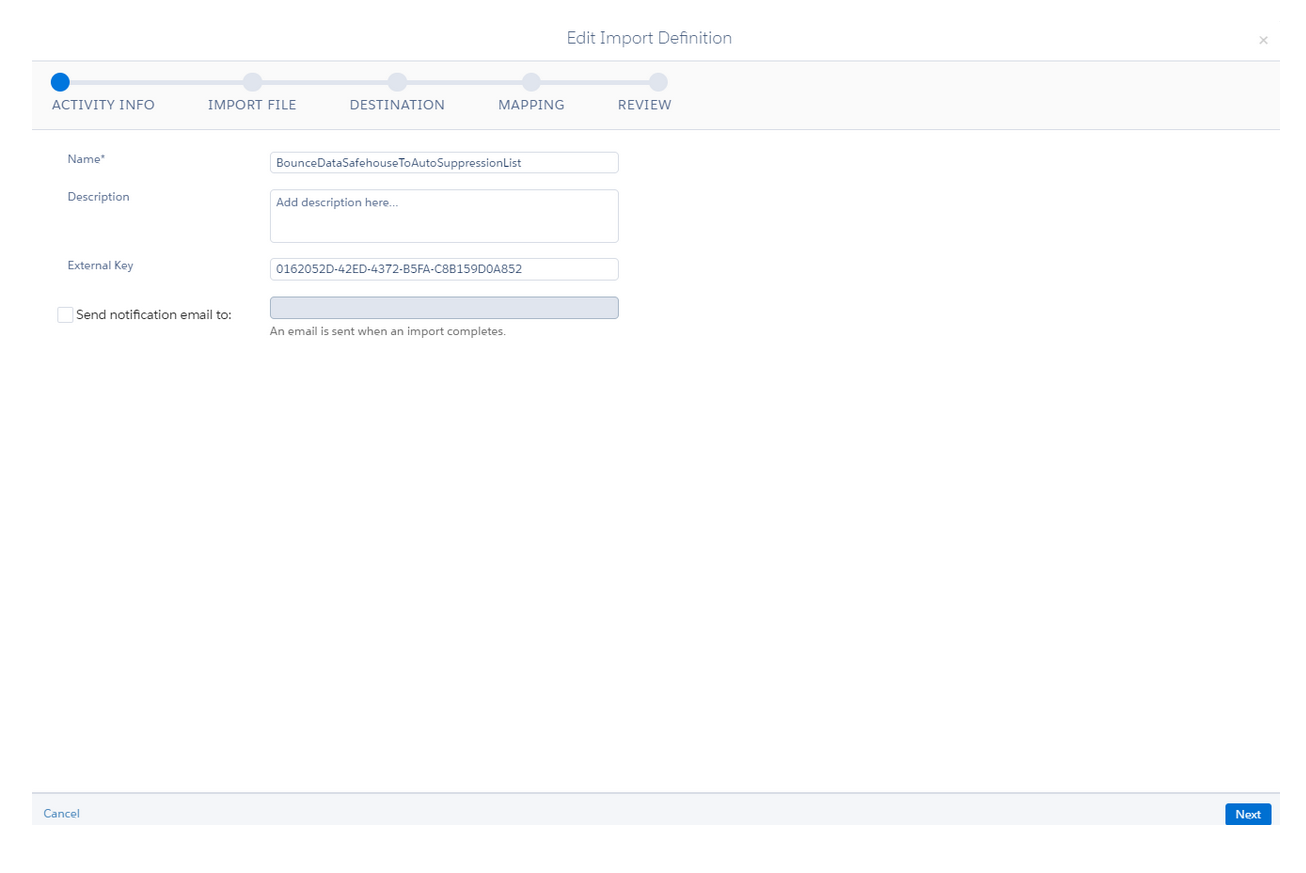
- Next, create an Import Activity to import data into the auto-suppression list you created.
A. Complete the Properties section:
- Fill in the name and description.
- Click Next.
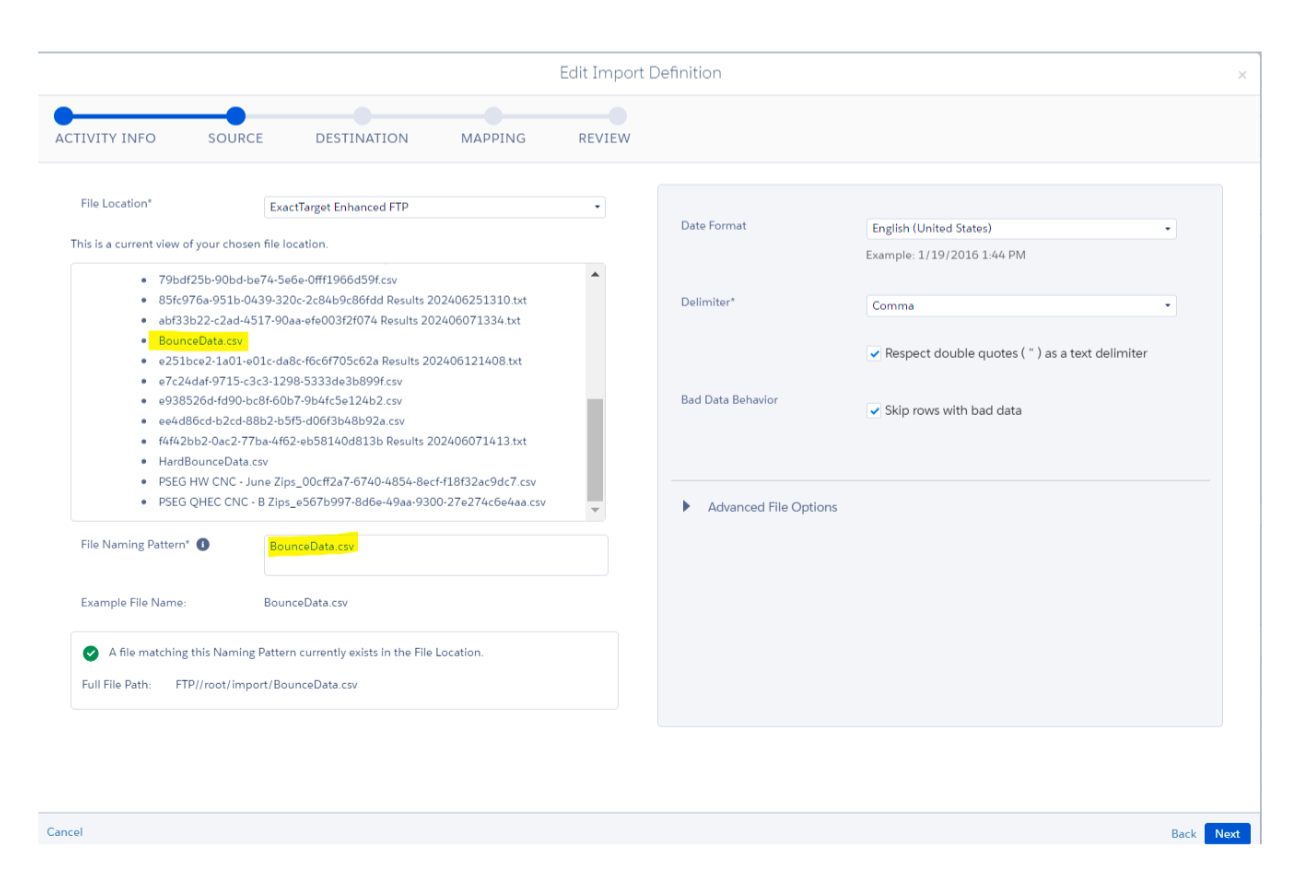
In the Source step, choose the file location, which determines where the imported file will come from. Specify the file naming pattern to customize file names, making your automation process more organized and clear.
B. Complete the Properties section:
- File Location: Enter the directory or path from which the file will be sourced.
- File Naming Pattern: Define a pattern for naming files.
- Date Format: Maintain the existing format for dates.
- Delimiter: Set the delimiter to a comma for data separation.
- Select Respect double quotes & Skip rows with bad data.
- Click Next.
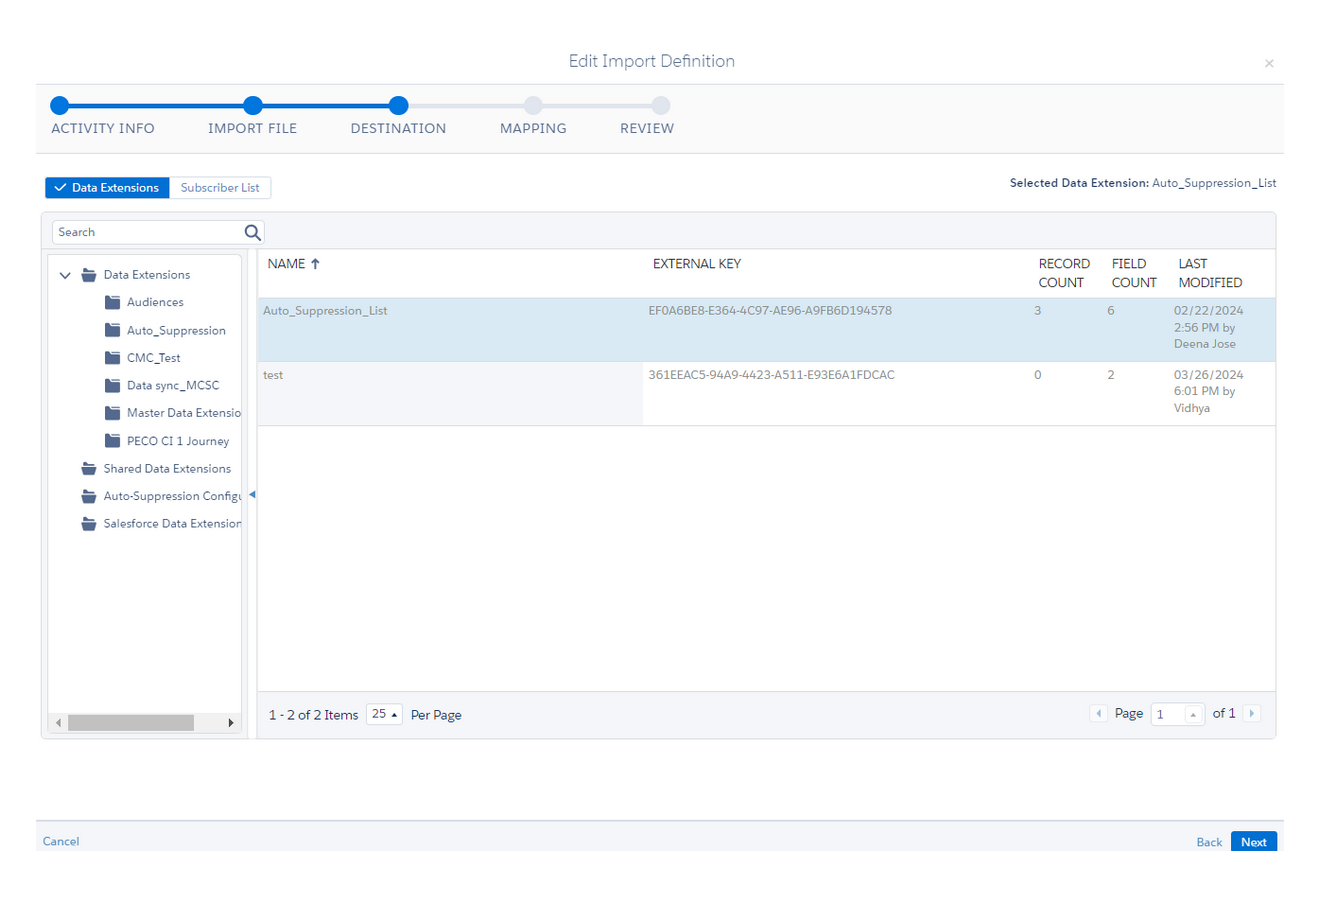
C. Destination Type refers to the target location where your data or information will be stored.
- Go to Data Extensions > Auto-Suppression Configuration folder > Auto-Suppression List.
- Click Next.
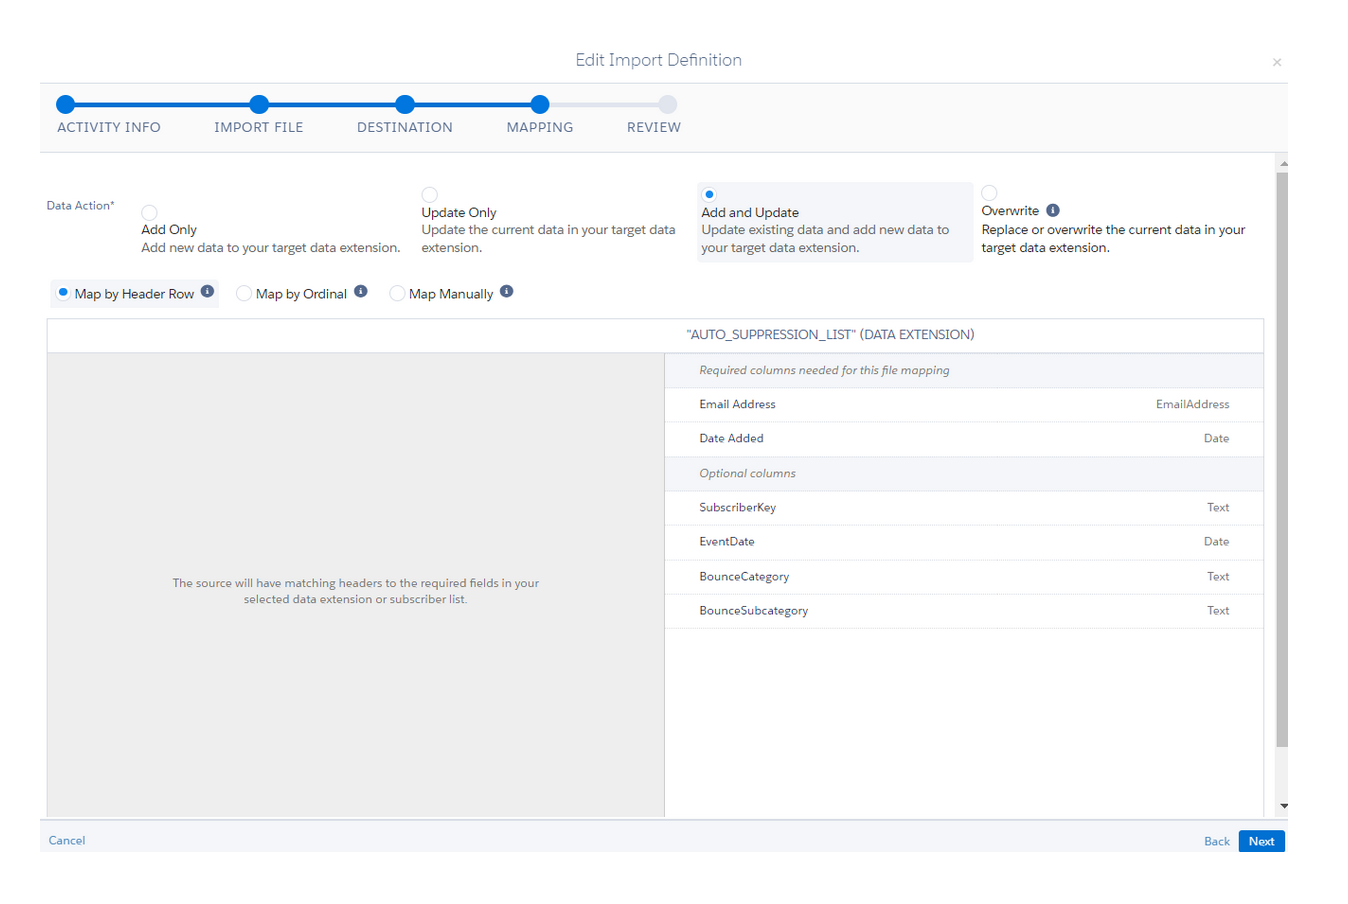
D. Select Add and Update in the Data Action section.
- Map the required fields under Mapping.
- Click Next.
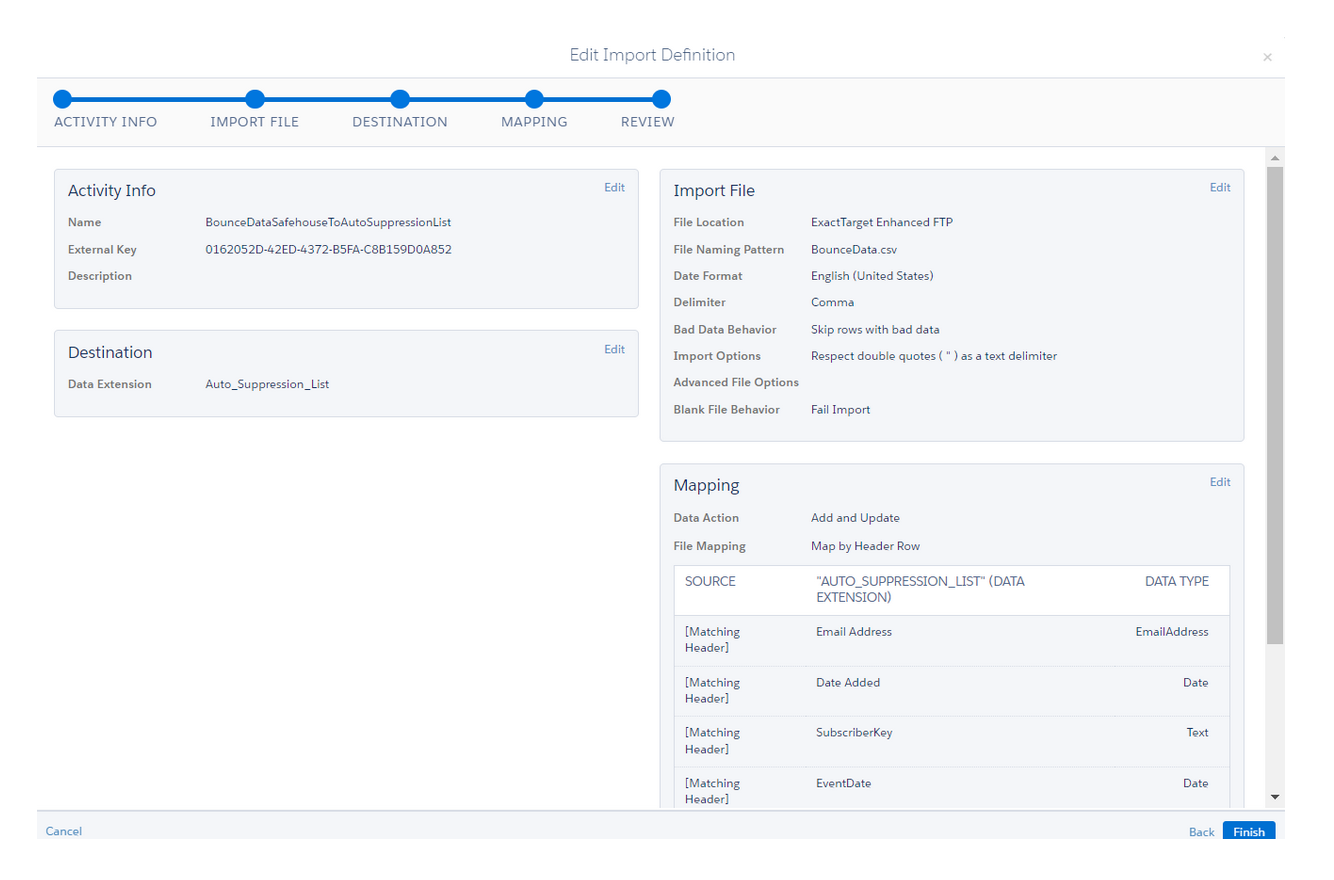
E. After completing the Import activity, you'll see a REVIEW screen with a summary of the Import Activity. Do a quick check to make sure all the details are there and click Finish.
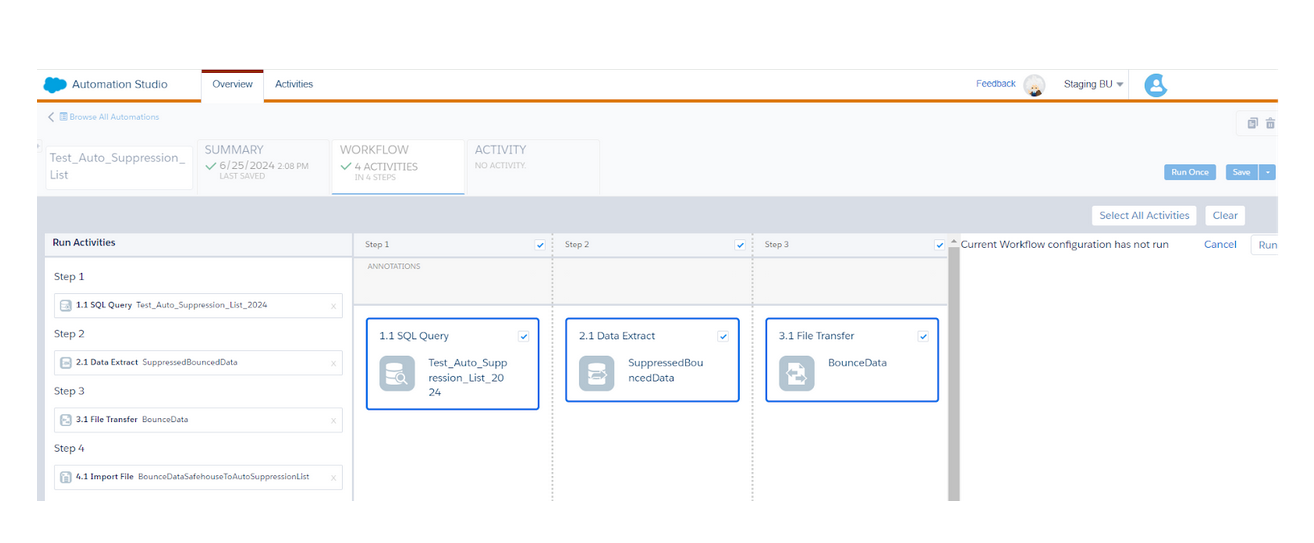
- Click Save to save this automation workflow. You can schedule it for regular runs or choose to run it just once. To run it immediately, select Run Once.
- From the window that appears, select All Activities to ensure all components of the automation are executed.
- Finally, click Run.
Once this is done, email addresses that repeatedly fail delivery due to issues like invalid addresses or blocked domains will automatically get updated in the auto-suppression list. All problematic email addresses will be excluded from future campaigns, enhancing the deliverability and effectiveness of your email marketing efforts.
NOTE: To consistently manage hard bounces and maintain list hygiene, it is crucial to regularly monitor metrics such as bounce rate and unsubscribe rate. Such a data-driven approach can help you ensure that your emails reach the right inboxes and resonate with your audience.
This article is based on a requirement we fulfilled for a client. Write to us if you have trouble managing hard bounces in Salesforce Marketing Cloud or if you wish to learn more about our marketing automation services.