


The option to communicate with external systems is a cool feature to have in any platform. In Adobe Campaign, daily updates from external systems are made via a CSV or TXT file. But what if we want to push real-time data to Adobe Campaign, and more specifically to the recipient table? Then we have to make use of SOAP web services.
SOAP methods and SOAP calls can seem tricky to master if you are new to them. Adobe has some documentation but unfamiliarity with XML can cause you to stumble. Being new to Adobe Campaign, you might be new to XML as well because most of the recent developments had a JSON and REST inclination. Also, you may not find documentation that explains all those steps you need to know about web service calls in one place.
I hope to break down some of it for you in this article, particularly how you can call Adobe Campaign SOAP APIs using a client app like Postman.
First, what’s SOAP?
SOAP (short for Simple Object Access Protocol) is a messaging protocol preferred in use cases involving critical transactions that require upholding message integrity and authenticity. Banking transactions, geopositioning/navigation, and even communications between operating systems use SOAP. Windows Web Services API is a customized form of SOAP, to give you an example. SOAP is considered more secure than REST as it supports extra security through WS security (which REST doesn’t support).
The base of a SOAP call is XML. The content of a SOAP Call comprises the SOAP Envelope, which is the container (root element) for SOAP Header and SOAP Body. The below image should give you a rough idea of the structure of a normal SOAP call.
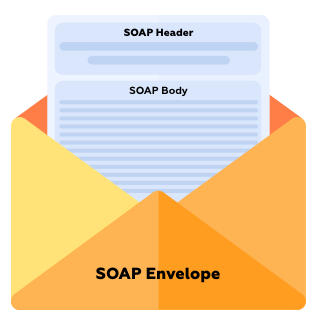
SOAP Header contains information such as application version, debug mode, client-id, or any other data required to process the message an application has received. Access tokens and other environment details required for the application can be included in this tag. This is an optional part and, if present, should be the first child element of SOAP Envelope.
SOAP Body contains the message to be sent to an application. There is an additional element called SOAP fault that can be added to the body tag. Fault is used to pass on details of errors in message processing through sub-elements such as <faultcode> (error code or type), <faultstring>(high-level description of error), and <detail> (complete detail of error) tags.
SOAP Envelope encloses the entire message to be sent to an application. It provides boundaries for the message. SOAP Envelope is the root element of all SOAP calls and has the header and body enclosed inside as child elements.
Here is a skeleton of a basic SOAP message.
<?xml version = "1.0"?>
<soapenv:Envelope xmlns:soapenv = "http://www.w3.org/2001/12/soapenvelope"
  soapenv:encodingStyle = "http://www.w3.org/2001/12/soap-encoding">
  <soapenv:Header>
      ...
  </soapenv:Header>
  <soapenv:Body>
     ...
     <soapenv:Fault>
    ...
     </soapenv:Fault>
  </soapenv:Body>
</soapenv:Envelope>
Now that’s pretty much the basics of SOAP!
How to Call SOAP Web Services in Adobe Campaign
Now let me show you how to call APIs for the following fundamental operations:
- Login API
- Insert/Update Recipient API
- Fetch Recipient API
- Trigger Workflow API
You need to call the login API before you can use any other APIs. The session token and security token generated from login API is required to ensure your authenticity when you call other APIs.
Prerequisites
To simulate an external system calling Adobe Campaign APIs, you need an API client application that will act as the external entity. For the purpose of this demo, I’m using Postman app. If you don’t have Postman installed, you can download it from here. You are free to use any API testing tool you are familiar with.
1. Login API
As I mentioned earlier, for Adobe Campaign SOAP calls to work, we need a session token and a security token with which Adobe can verify user rights and authenticity. The URL for login API is <your AC server >/nl/jsp/soaprouter.jsp
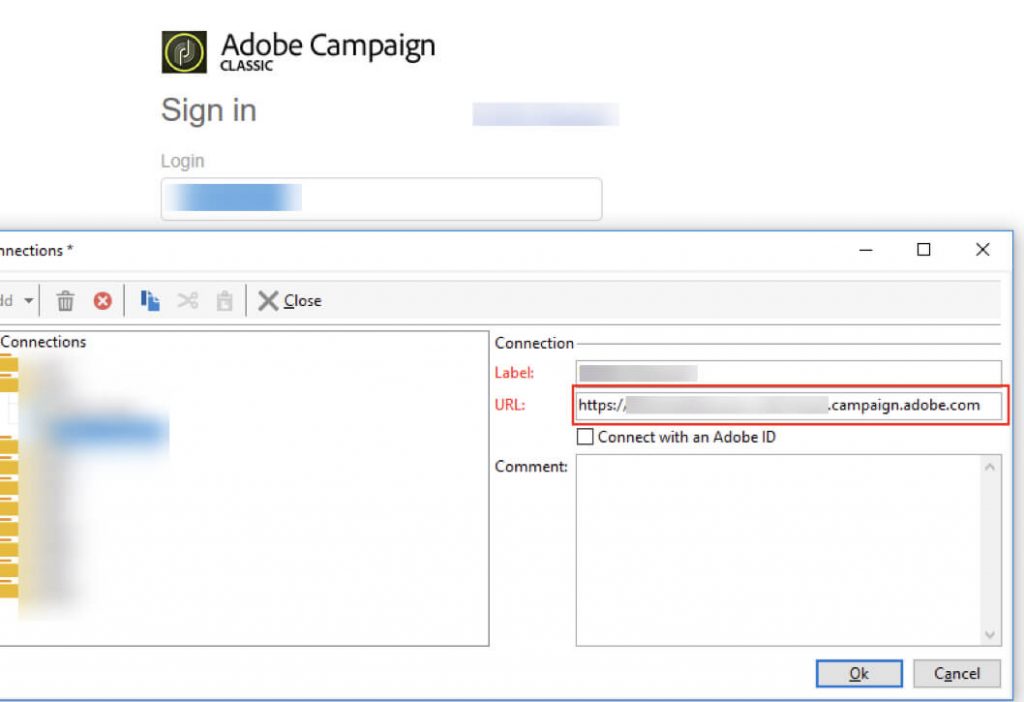
You just need to gather your Adobe server URL (the one you used in client console) as highlighted in Figure 2.
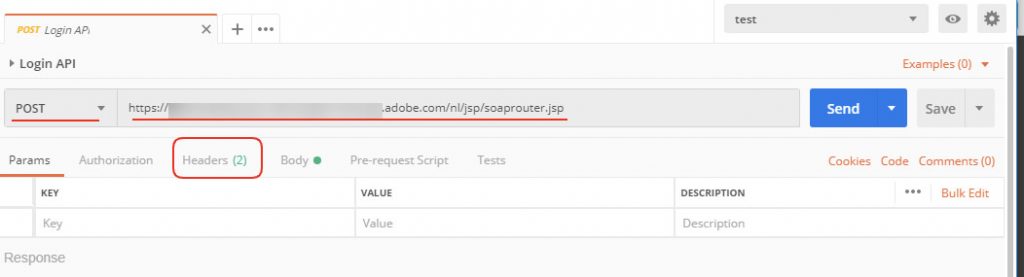
You also need a username and password. Now open Postman (or whatever API testing tool you are using) and set the API parameters.

In Postman, create a new API and give it a name. I’m going to call it “Login API”. Refer screenshot Figure 3 and set the following parameters:
1. Set request type as POST.
2. Set the request URL to be the same as <your AC server >/nl/jsp/soaprouter.jsp discussed previously.
Now your API should look like this (Figure 4):
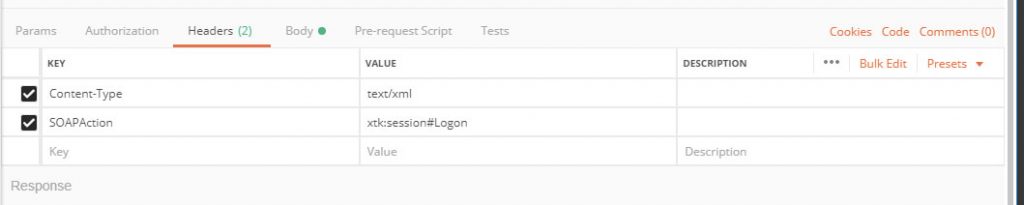
It’s time to set the header parameters highlighted in the screenshot above.
The headers needed for the API are:
| Content-Type | text/xml |
| SOAPAction | xtk:session#Logon |
The Logon is the SOAP method that facilitates the login functionality in Adobe Campaign. Identifying the right function for the API is the most important part of a SOAP call.
After setting these parameters, your header tab should look like this:
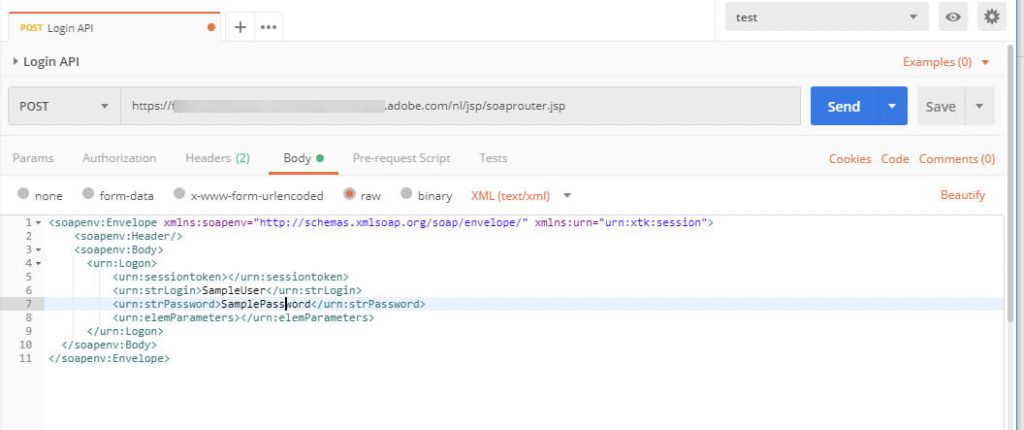
The next step is filling the request body. Go to the body tab and set the following SOAP envelope in raw format:
<soapenv:Envelope xmlns:soapenv="http://schemas.xmlsoap.org/soap/envelope/" xmlns:urn="urn:xtk:session">
    <soapenv:Header/>
    <soapenv:Body>
     <urn:Logon>
         <urn:sessiontoken></urn:sessiontoken>
         <urn:strLogin>SampleUsername</urn:strLogin>
         <urn:strPassword>SamplePassword</urn:strPassword>
         <urn:elemParameters></urn:elemParameters>
     </urn:Logon>
 </soapenv:Body>
</soapenv:Envelope>
In the above code, just replace SampleUsername and SamplePassword with your Adobe Campaign username and password. After filling in all the details, your request body should be like this:
This is all you need to do for a login API call to Adobe Campaign server. Click the Send button and you will get the response object.
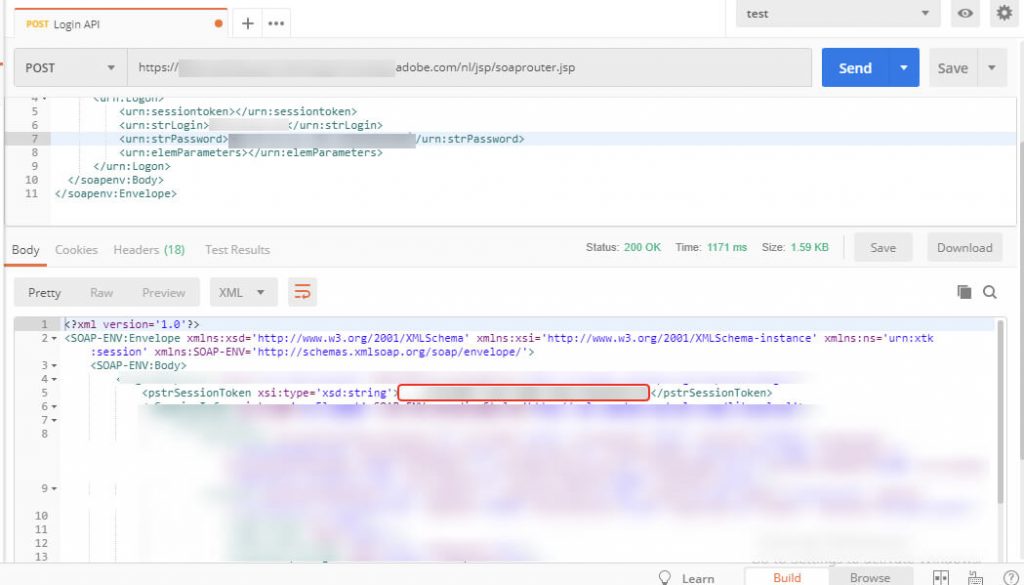
Note down value inside <pstrSessionToken> tag as highlighted in above screenshot (Figure 7). This is our session token. Now we need the security token. To obtain that, scroll down your response object to find the end of LogonResponse (see Figure below).

The value inside the <pstrSecurityToken> tag is your security token. You will need that as well for the next APIs. With this, our login actions are over and we are ready to interact with Adobe Campaign.
2. Insert/Update Recipient API
Now that you know how to set up Postman, I'll be detailing only those areas that need modifications to call other APIs in Adobe Campaign. Create a new API in Postman first. Then set the URL and request-type to post as you did for login (Figure 3). Then set the following headers:
| Content-Type | text/xml |
| SOAPAction | xtk:persist#Write |
| X-Security-Token | <your security token> |
| cookie | __sessiontoken=<your session token> |
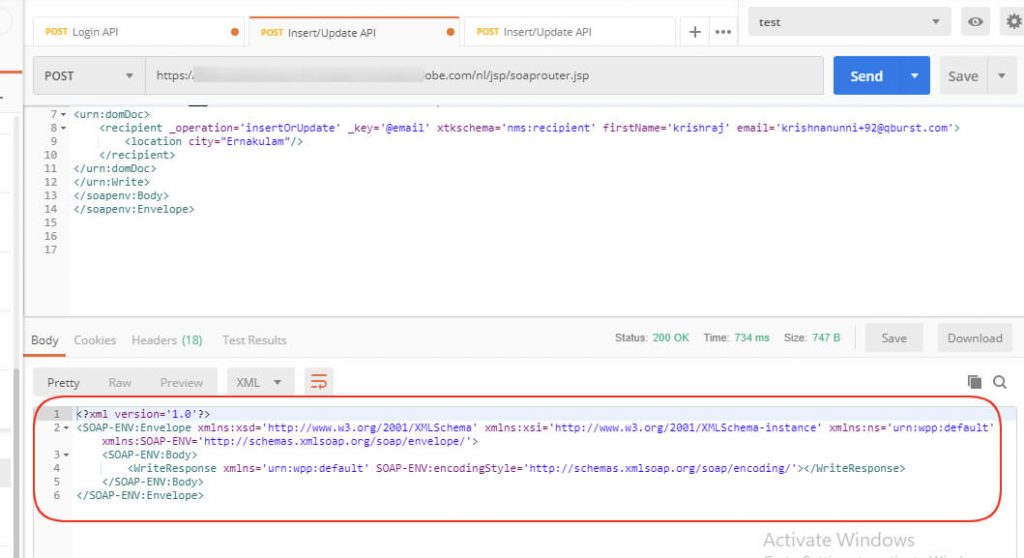
The SOAP method we are calling is Write, which will insert/update data into Adobe Campaign recipient table. You will have to run the login API first to obtain the security token and session token for the above header parameters. Once the header settings are done, set the request body as shown below:
<?xml version='1.0' encoding='ISO-8859-1'?>
<soapenv:Envelope xmlns:soapenv='http://schemas.xmlsoap.org/soap/envelope/' xmlns:urn='urn:xtk:session'>
<soapenv:Header/>
<soapenv:Body>
<urn:Write>
<urn:sessiontoken><your session token></urn:sessiontoken>
<urn:domDoc>
    <recipient _operation='insertOrUpdate' _key='@email'
               xtkschema='nms:recipient' firstName='krishnanunni'
               email='krishnanunni+92@qburst.com'>
        <location city="Ernakulam"/>
    </recipient>
</urn:domDoc>
</urn:Write>
</soapenv:Body>
</soapenv:Envelope>
Proceed to send the API, which will insert a new recipient or update an existing recipient based on the _key attribute (here, email is the reconciliation key that will update recipient if email matches). You can add other attributes to the recipient data as you like. Once you have submitted the API request, check the API response area of Postman. If you get a blank SOAP body without any faults, as in the screenshot below (Figure 9), it means your API has been successfully executed and the recipient has been created.
Now log into your Adobe Campaign instance to confirm that the recipient has been created. Execute a query to filter recipients by details you provided in the request body. For example, you can query the recipient using your email address to see if it is inserted successfully.
I’m sure you will be excited to see the recipient inserted successfully! Now that you have a record in the recipient table, let's fetch this user through a Query API.
3. Fetch Recipient API
You might be wondering what a query looks like in a SOAP call. It’s similar to a normal SQL query, but written in XML. Let’s learn this API by comparing and relating it with an SQL query. If we want to query a table in SQL, we should have an idea of the columns to retrieve along with the WHERE clause to filter out the right targets. Here’s a sample SQL query:
| SELECT firstName,lastName,email FROM NmsRecipient WHERE email=’krishnanunni@qburst.com’ |
Now let’s see how it is implemented in a SOAP API.
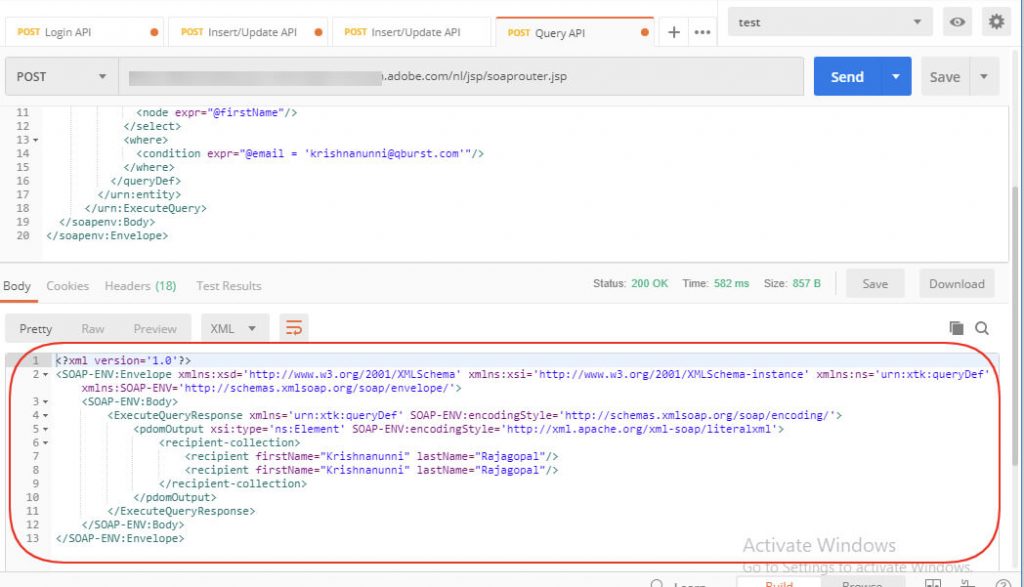
Create a new API in Postman with the name QueryAPI. Then set the URL and request type to post as you did for login. First run the login API to get tokens and then set the following headers:
| Content-Type | application/xml |
| SOAPAction | xtk:queryDef#ExecuteQuery |
| X-Security-Token | <your security token> |
| cookie | __sessiontoken=<your session token> |
ExecuteQuery is the name of the SOAP method that we are calling to. Set the request body as follows:
<soapenv:Envelope xmlns:soapenv="http://schemas.xmlsoap.org/soap/envelope/" xmlns:urn="urn:xtk:queryDef">
 <soapenv:Header/>
   <soapenv:Body>
     <urn:ExecuteQuery>
       <urn:sessiontoken><your session token></urn:sessiontoken>
       <urn:entity>
         <queryDef operation="select" schema="nms:recipient">
           <select>
             <node expr="@email"/>
             <node expr="@lastName"/>
             <node expr="@firstName"/>
           </select>
           <where>
             <condition expr="@email = 'krishnanunni@qburst.com'"/>
           </where>
         </queryDef>
       </urn:entity>
     </urn:ExecuteQuery>
 </soapenv:Body>
</soapenv:Envelope>
In the <queryDef> tag, specify the operation type as “select” and specify the table/schema from which we want to query the data. Then specify the columns to select and the WHERE condition. (Now you can see the resemblance with SQL query that I mentioned earlier. Relate and learn!) You are all good to send the query request. Hit Send and watch the response text. You should get some response inside the <recipient-collection> tag as shown below.
If there are no matching recipients for your query, you will get an empty <recipient-collection> tag as shown below.

You reap what you sow! Hope you now have a picture of data handling.
Next, let’s trigger a workflow using an API and pass a parameter to the workflow.
4. Trigger Workflow API
Rather than just updating information, you may also want to trigger some campaigns or some technical workflows based on user interactions. For example, you may want to trigger a welcome campaign workflow that sends emails to those who are newly registered to your eCommerce website.
Create a new API in Postman for Workflow Trigger API. Then set the URL and request type to post as you did for login. Set the following headers after you obtain security and session tokens from login API.
| Content-Type | text/xml |
| SOAPAction | xtk:workflow#PostEvent |
| X-Security-Token | <your security token> |
| cookie | __sessiontoken=<your session token> |
The method we are using is named PostEvent. Let’s set the request body with parameters required for PostEvent method as follows:
<SOAP-ENV:Envelope xmlns:SOAP-ENV="http://schemas.xmlsoap.org/soap/envelope/"
  xmlns:ns0="urn:xtk:workflow">
  <SOAP-ENV:Header />
  <SOAP-ENV:Body>
    <PostEvent>
      <sessiontoken><your session token></sessiontoken>
           <strWorkflowId>WKF51</strWorkflowId>
           <strActivity>signal</strActivity>
           <strTransition></strTransition>
           <parameters>
             <variables filepath="somepath"/>
           </parameters>
           <complete></complete>
    </PostEvent>
  </SOAP-ENV:Body>
</SOAP-ENV:Envelope>
Note that the value inside <strWorkflowId> should be the internal name of your workflow and not the label. Also, the value inside <strActivity> should be the internal name too. If you find the workflow is not working, go back and check these values again.
Enter the values required for the workflow to run in the <parameters> tag as in the above code. For example, with the above code, the variable tag with attribute filepath will be available in workflow as vars.filepath with the value “somepath”, right after the external signal activity.
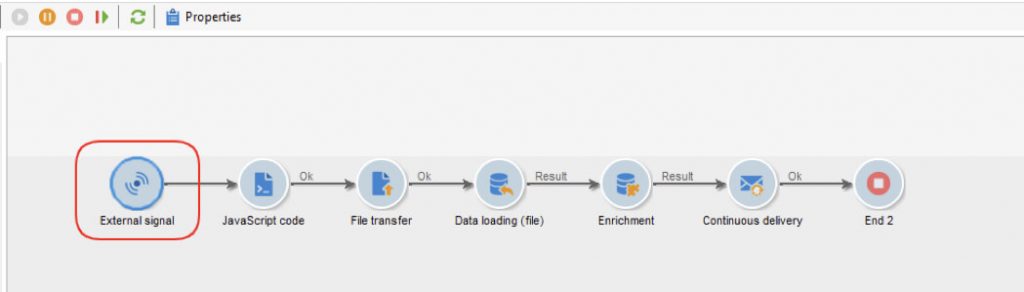
We need an external signal activity instead of the start activity for the workflow to continuously run and respond to API requests as shown below:
In the javascript code next to the external signal, store the value of the variable passed in API to an instance variable (Figure 13) so that it will be accessible throughout the workflow.
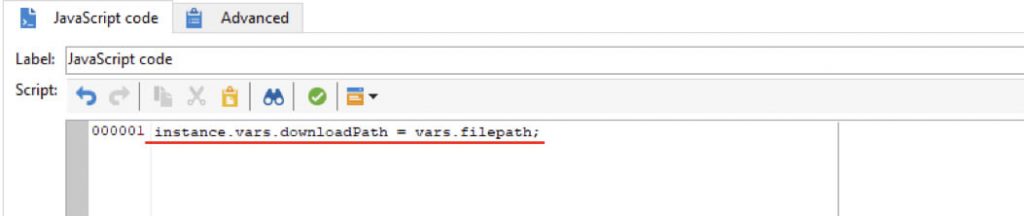
Now we can use instance.vars.downloadPath inside our File Transfer activity and download the respective file.
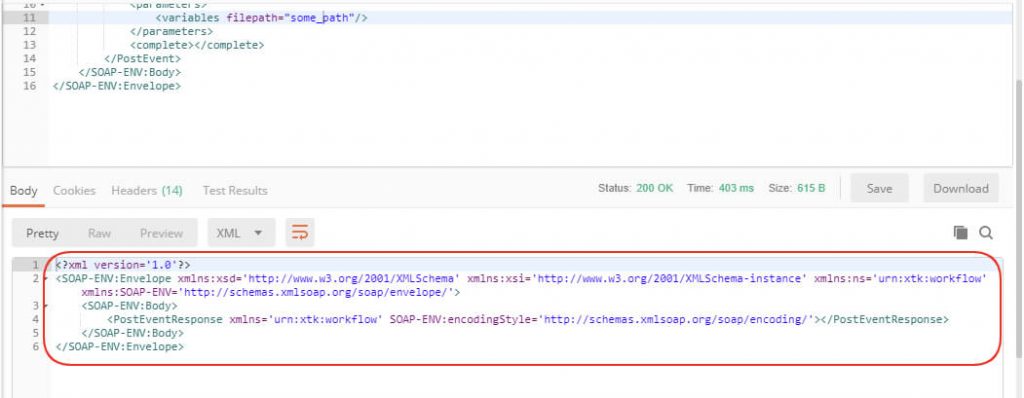
If you have your API ready in Postman and workflow running in Adobe Campaign, you can call the workflow trigger API. You will get an empty <PostEventResponse> if the API is successful (as shown in the screenshot below). Refresh and take a look at your workflow to confirm successful execution.
With that, I hope you got a working idea of SOAP Web Service in Adobe Campaign. Reach out to us if you have any questions.