Organizations that automate Adobe Campaign exports and apply Git-based version control typically see delivery times improve by up to 30% and configuration errors reduced by 70%. For marketers, this translates into faster time-to-market and greater confidence in global deployments.
The reason is simple. Manual exports often lead to delays and confusion over who made a change. Automating the process eliminates these risks while version control allows visibility, quick rollback, and easier collaboration across teams and regions.
This post outlines the practical steps to build a setup that is reliable, maintainable, and proven in enterprise environments.
Creating a Package Definition
The first step is to create a package definition. Think of this as the blueprint for your export; it's what generates the XML file that contains all the elements you've chosen.
You have the option of putting everything into a single package or splitting it into multiple packages. I recommend splitting them. For example, keeping your workflows, schemas, and folders in separate packages will make them easier to manage and debug. If you ever need to make a quick change to a single item, you won't have to wade through a massive package.
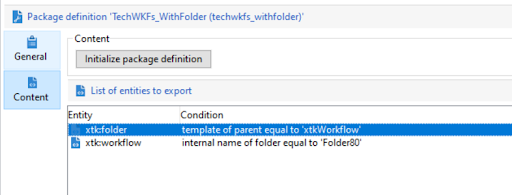
You can create a package definition from Administration > Configuration > Package Management > Package definitions. (See screenshot below for reference.)

Use Unique Identifiers
For exports and imports to work correctly, every item, whether it’s a folder, workflow, delivery, or schema, needs a unique internal name.
Avoid system-generated names like folder12, which can differ between staging and production depending on the order they were created. Instead, create meaningful names that are consistent across all environments (for example, migration_folder).
Taking the time to set these identifiers properly upfront will save you from major headaches later on. Without them, imports may break, particularly if related folders are not included.
Key Entities to Include
The entities you include in your package definition depend on what you're exporting. Here are the ones you'll use most often:
- Schemas
(xtk:srcSchema) - Workflows
(xtk:workflow) - Delivery templates
(nms:delivery) - Campaign templates
(nms:operation) - Folders
(xtk:folder)
Configurations
Beyond the core entities, here are some other configurations you might need to include in your package definitions:
- Input forms
(xtk:form) - Navigation hierarchies
(xtk:navtree) - Predefined filters
(xtk:queryFilter) - Typologies
(nms:typology, nms:typologyRule)
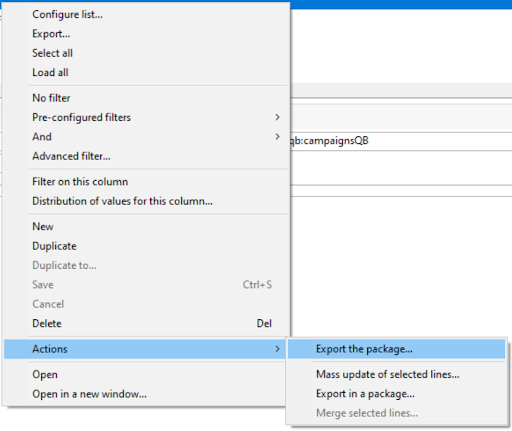
Tip: You can also add specific components directly from their respective screens. For example, you can right-click a workflow and select Actions > Export in package.
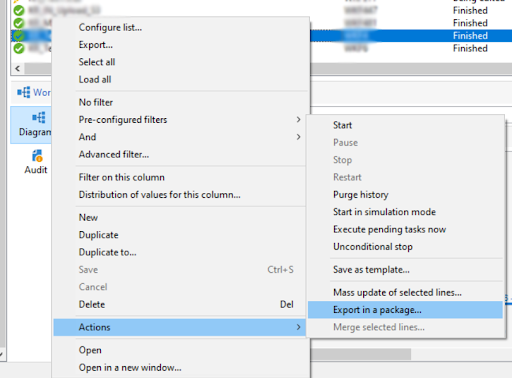
If you want to export a component immediately, select Export now.
If you’d rather add it to an existing package definition, select the target package definition.
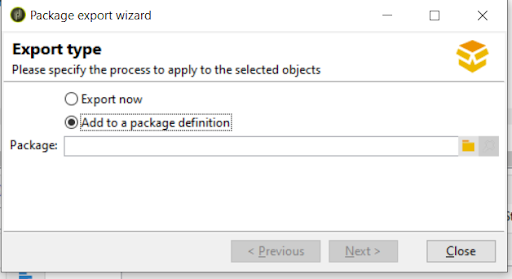
Once the package is selected, click Next, and the definition will update automatically.
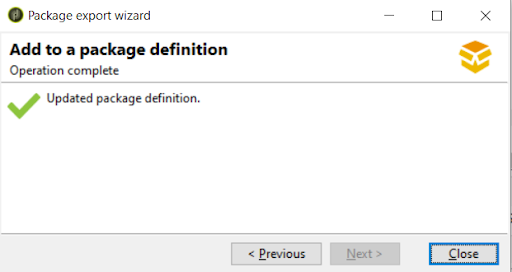
The specific condition to identify the selected component will be added automatically in the package definition. This is useful in case you want to export a set of workflows or schemas. You can create the package definition and add the components from their respective sections.
You can also add multiple components in one go: hold Ctrl to select them, then choose Export in package. This allows you to build comprehensive package definitions directly, without any manual setup.
Exporting Packages
There are two ways to export a package:
Manual export – Once your package definition is ready, select it and click Export package (or right-click → Actions → Export package). This downloads the XML to your local machine.
Automated export – If you don’t need full version control but just need automated deployment, you can automate exports with a technical workflow. Typically, this involves exporting the package to SFTP, uploading to a storage service like S3, and then making it available for production. Adobe provides a JavaScript API to generate and transfer packages, which can be integrated into this workflow.

Export Packages Activity
The Export packages activity contains the code that sends package components to SFTP. It uses the queryDef
For this demonstration, I've focused on package definitions created with the namespace qb.
var PackageArray = instance.vars.packages.split(/,/)
var query = xtk.queryDef.create(

<queryDef schema="xtk:specFile" operation="select">
  <select>
  <node expr="@name"/>
  <node expr="@namespace"/>
  <node expr="data"/>
  </select>
</queryDef>
);

var res = query.ExecuteQuery();
var exported = 0;
for (var i = 0;i<Object.keys(res).length; i++){
  packageName = res[i].@label;
   logInfo(packageName+" "+PackageArray[0])
  for (var j=0; j<instance.vars.numberOfPackages; j++) {
    if(packageName == PackageArray[j]) {
    logInfo("res[i]" + res[i].@label)
    createSFTPFile(instance.vars.SFTP_Path,res[i].@label + ".xml",res[i])
    exported++;
    } else {
      continue
    }
  }
}

function createSFTPFile(sftpPath, sftpFile, res) {
  try{
      var specFile = xtk.specFile.create(res);
      var package = specFile.GenerateDoc();
      var fileName =  sftpPath + sftpFile;
      saveXmlFile(package, fileName);
      appendToFile(sftpPath+"FileList.txt",sftpFile)
     }
   catch(err){
           logWarning("Error:"+err);
     }

}

function appendToFile(filepath, text) {
  var fileWrite = new File(filepath);
  if (fileWrite.exists) {
     fileWrite.open("a", File.CODEPAGE_UTF8)
  } else {
     fileWrite.open("w", File.CODEPAGE_UTF8)
  }
   fileWrite.write(text+"\n");
   fileWrite.close();
}
Built-in Package Initializations
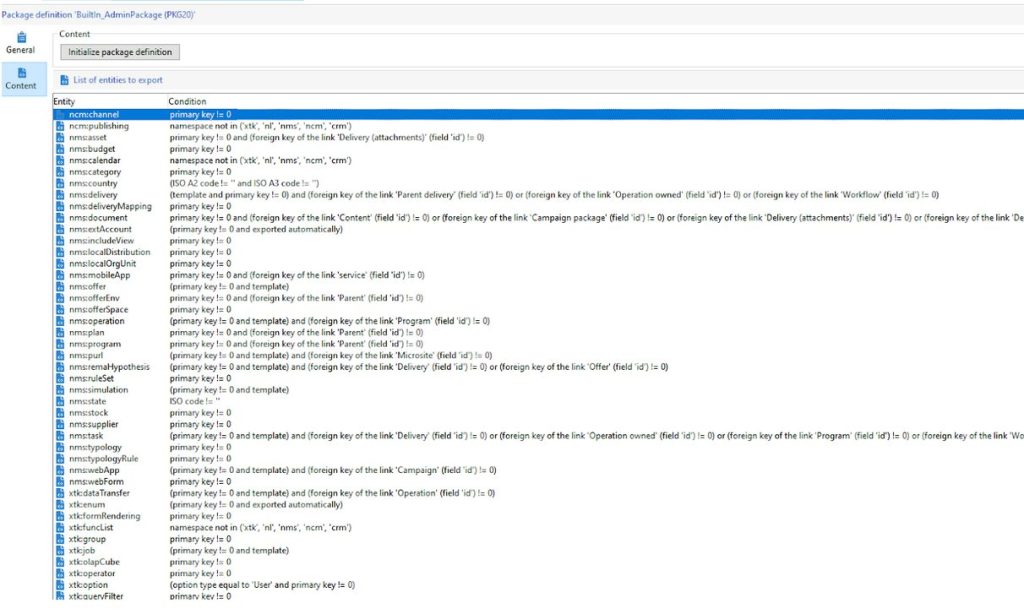
Adobe Campaign includes two built-in package initializations that provide a quick starting point for exports:
- Platform: Technical resources like schemas, JavaScript, and related technical objects
- Admin: Business-facing assets like templates, libraries, and other operational objects
Both initializations come with a predefined list of exportable entities and filters that exclude default resources.
Importing Packages
Once you’ve exported the package XML from the source instance, you can import it into production.
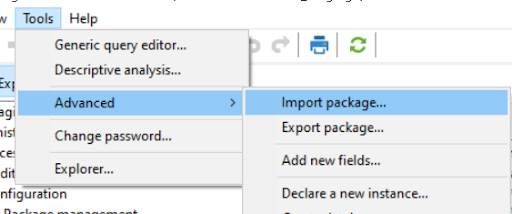
The process is similar to a manual export. Navigate to: Tools → Advanced → Import package.
Here you can either:
- Install one of the standard Adobe packages available with your license, or
- Import a package from a file.
For migrating changes from staging, select “Import a package from a file” and click Next.
On the next screen, choose the exported package XML file. Its content will automatically appear in the text area below the file selector. At this point, you can change labels or adjust prefixes and suffixes. However, be careful with any edits. If your changes are inconsistent, the components won't import correctly.
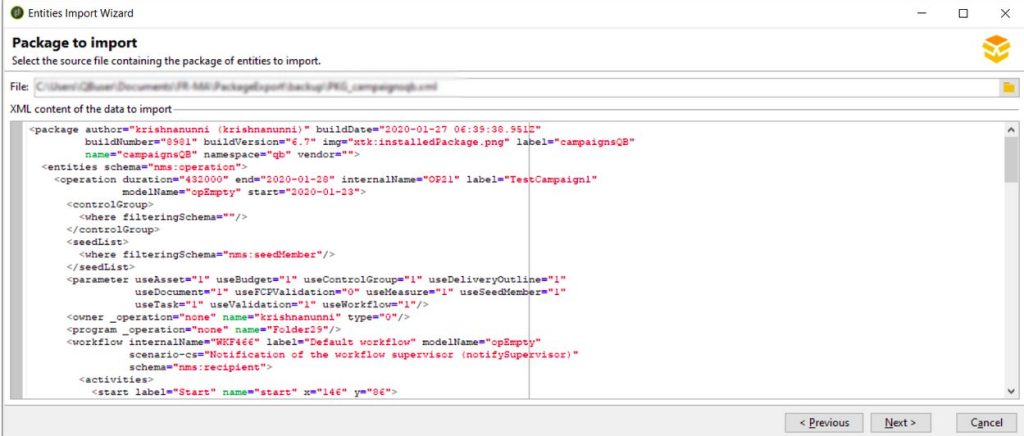
Once you’ve confirmed the XML, start the installation process.
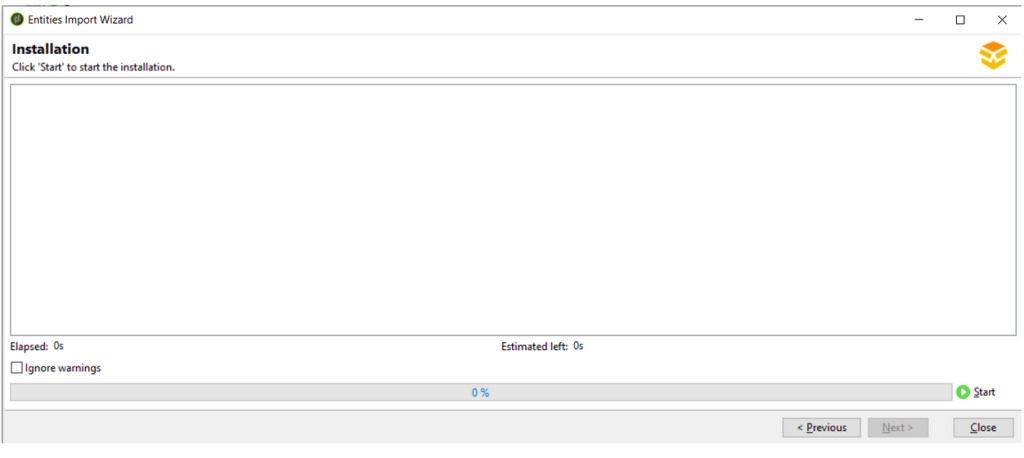
Adobe Campaign will then place the package components in their designated folders according to your export settings.
You can review the results in Package → Installed packages.
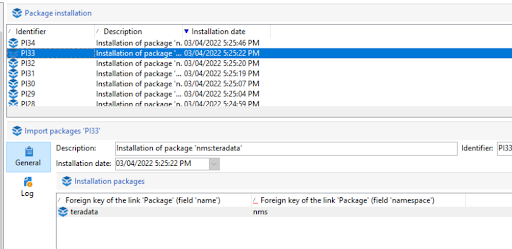
Common Issues and Workarounds
A few things can go wrong when importing packages from staging to production:
- Unwanted folders included: Sometimes, extra folders or components may get pulled into the package. This usually happens when filters are missing or when
xtk:folderis included without restrictions. So, always review your package definition and apply filters to include only the folders or entities you need.
- Missing folders in production: If the right folders aren’t already set up in production, some components might not import properly. To fix this, you can either create those folders ahead of time or add
xtk:folderto your package so the folders come along with the import.
- External account ID mismatches: File transfer workflows may fail if the external account IDs aren’t the same across environments. This is a common issue when SFTP or other external connectors are used. Before you import, check the account IDs in your package XML and update them so they match the production setup.
Version Control
Adobe Campaign does not provide native integration with GitHub or other version control systems. While AWS CLI commands can be installed, Adobe has confirmed that Git CLI itself cannot be used on their hosted environments.
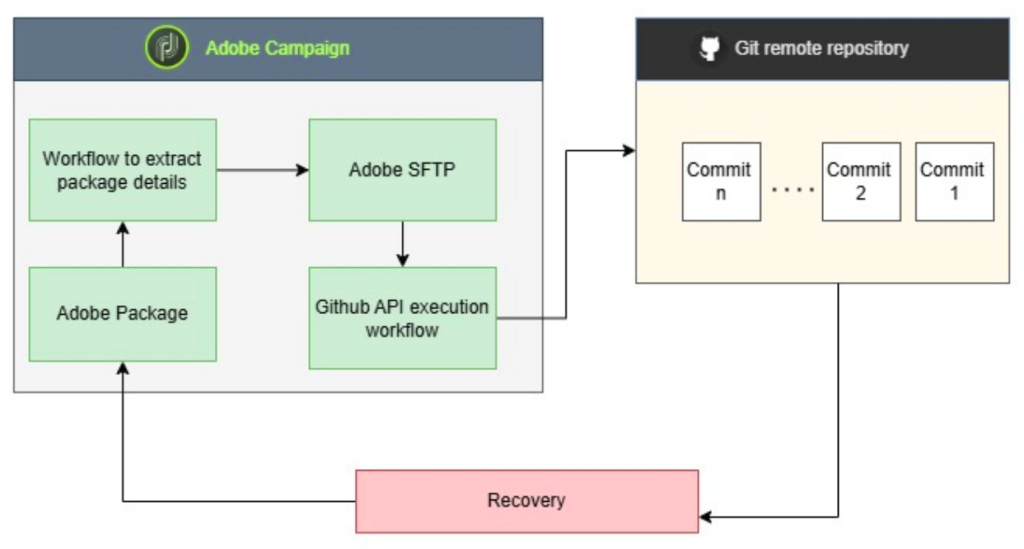
Through research and proof-of-concept work, we identified an alternative approach to integrate Adobe Campaign with GitHub. By leveraging the GitHub REST APIs via curl, it is possible to push exported files (generated through the workflow described earlier) directly into a GitHub repository.
The diagram below illustrates this architecture and how version control can be layered into Adobe Campaign environments.
GitHub Repository Prerequisites
Before you can push exported packages from Adobe Campaign to GitHub, you need to configure repository access. This process involves two potential steps:
1. (Optional) Create a GitHub App
Go to GitHub → Settings → Developer Settings → GitHub Apps and create a new app. Since callback URLs or webhooks aren’t used in this setup, you can either skip those fields, provide dummy values, or disable them if not mandatory.
2. Generate a Personal Access Token (PAT)
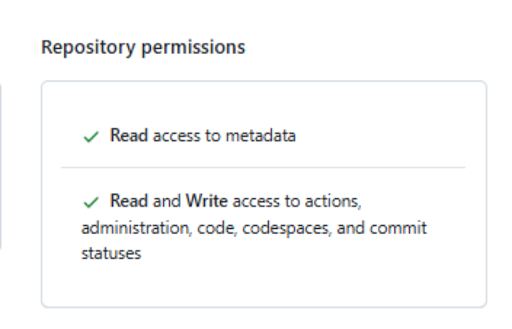
Navigate to GitHub → Settings → Developer Settings → Personal Access Tokens and create a new Fine-Grained access token.
- Select Only select repositories and choose the required repo.
- Provide the necessary permissions (see screenshot below).
Setting Up the Workflow to Push Files to GitHub
The workflow setup is fairly simple (See image below).

There are two main activities:
1. Export Packages – This is the same Export packages activity explained earlier. It’s a JavaScript step that generates package exports and saves them to Adobe Campaign’s SFTP location. These exported files are then pushed to GitHub.
2. Push to GitHub – This is a shell script activity that uses curl to call the GitHub REST APIs. The exported packages are uploaded to the repository in a single commit.
Key Steps in the Push to GitHub Activity
- Set up authentication and parameters – Initialize the GitHub access token, repository URL, commit message, and SFTP file paths.
- Remove BOM characters – Clean any invisible Byte Order Mark (BOM) characters from the file list.
- Fetch the latest Git state – Retrieve the latest commit SHA from the main branch and extract its tree SHA (the current folder structure).
- Prepare a new file tree – For each file:
- Check if it exists
- Encode its content in Base64
- Upload it as a GitHub “blob” to get its SHA
- Add it to the new tree object
- Create a new commit – Generate a new commit using the new tree SHA and link it back to the previous commit for proper history.
- Update the branch – Move the main branch pointer to the new commit, making the uploaded files part of the repository.
The script below shows how this step is implemented in the workflow:
############# Initialize GitHub API Parameters ####################
GITHUB_TOKEN="<%= instance.vars.authToken %>"
GITHUB_REPO_API="<%= instance.vars.githubRepo %>"
COMMIT_MESSAGE="<%= instance.vars.CommitMessage %>"

############# Define File Paths ####################
SFTP_DIR=<%= instance.vars.SFTP_Path %>

ORIGINAL_FILE_LIST="$SFTP_DIR/<%= instance.vars.PackageFileList %>"
CLEAN_FILE_LIST="$SFTP_DIR/NoBom_<%= instance.vars.PackageFileList %>"

############# Remove BOM (Byte Order Mark) ####################
# Remove any invisible BOM characters from the first line of the file list
sed -e '1s/^\xef\xbb\xbf//' "$ORIGINAL_FILE_LIST" > "$CLEAN_FILE_LIST"

############# Get Latest Commit from Main Branch ####################
latest_commit_sha=$(curl -s -X GET -H "$GITHUB_TOKEN" \
  --trace "<%= instance.vars.tracePathLatestCommit %>" \
  "$GITHUB_REPO_API/git/refs/heads/main" | jq -r '.object.sha')

echo "Latest Commit SHA: $latest_commit_sha"

############# Get Tree SHA from Latest Commit ####################
latest_tree_sha=$(curl -s -X GET -H "$GITHUB_TOKEN" \
  --trace "<%= instance.vars.tracePathLatestTree %>" \
  "$GITHUB_REPO_API/git/commits/$latest_commit_sha" | jq -r '.tree.sha')

echo "Latest Tree SHA: $latest_tree_sha"

############# Prepare New Tree Entries ####################
tree_array="["

while read -r file_name; do
  full_path="$SFTP_DIR/$file_name"

  if [[ -f "$full_path" ]]; then
    # Encode file content in base64 and create a blob in GitHub
    content_base64=$(base64 < "$full_path" | tr -d '\n')

    blob_sha=$(curl -s -X POST -H "$GITHUB_TOKEN" \
      -H "Accept: application/vnd.github+json" \
      "$GITHUB_REPO_API/git/blobs" \
      -d "{\"content\":\"$content_base64\",\"encoding\":\"base64\"}" | jq -r '.sha')

    # Add file entry to the tree array
    tree_array+="{\"path\":\"$file_name\",\"mode\":\"100644\",\"type\":\"blob\",\"sha\":\"$blob_sha\"},"
  else
    echo " File $file_name not found, skipping..."
  fi
done < "$CLEAN_FILE_LIST"

# Trim trailing comma and close JSON array
tree_array="${tree_array%,}]"

############# Create a New Tree with Uploaded Files ####################
new_tree_sha=$(curl -s -X POST -H "$GITHUB_TOKEN" \
  -H "Content-Type: application/json" \
  --trace "<%= instance.vars.tracePathNewTree %>" \
  -d "{\"base_tree\": \"$latest_tree_sha\", \"tree\": $tree_array}" \
  "$GITHUB_REPO_API/git/trees" | jq -r '.sha')

echo "New Tree SHA: $new_tree_sha"

############# Create a New Commit with New Tree ####################
new_commit_sha=$(curl -s -X POST -H "$GITHUB_TOKEN" \
  -H "Content-Type: application/json" \
  --trace "<%= instance.vars.tracePathNewCommit %>" \
  -d "{\"message\": \"$COMMIT_MESSAGE\", \"tree\": \"$new_tree_sha\", \"parents\": [\"$latest_commit_sha\"]}" \
  "$GITHUB_REPO_API/git/commits" | jq -r '.sha')

echo "New Commit SHA: $new_commit_sha"

############# Move 'main' Branch to New Commit ####################
curl -s -X PATCH -H "$GITHUB_TOKEN" \
  -H "Content-Type: application/json" \
  --trace "<%= instance.vars.tracePathChangeHead %>" \
  -d "{\"sha\": \"$new_commit_sha\"}" \
  "$GITHUB_REPO_API/git/refs/heads/main"

echo " Files successfully committed to GitHub!"
To customize the instance variables, we use the first definition activity. In this step, you can configure your commit message, GitHub credentials, file paths, and other parameters. In our specific setup, the commit message is set to a fixed text with a date stamp.
Why Versioning in GitHub Matters
Implementing version control through GitHub provides a range of practical benefits for Adobe Campaign teams:
- Traceability – Every change is logged and past versions are preserved.
- Rollback – Stable versions can be restored quickly if something goes wrong.
- Collaboration – Teams work with a shared, transparent record of updates.
- Security – Packages are stored safely in a governed GitHub repository.
Rollback Process
Restoring your Adobe Campaign instance to a previous version is straightforward:
- Full rollback – Download the required package version from GitHub and import it into your instance.
- Selective fixes – Open the package XML, locate the relevant component (such as a workflow or schema), and paste it into the source view of the component in Adobe Campaign.
As with any rollback, it’s best to have a backup of critical data before you make any changes.
In Summary
By combining package definitions, automated exports, and Git-based version control, Adobe Campaign teams can work with greater reliability, speed, and confidence. This approach not only reduces configuration errors and downtime but also aligns Campaign processes with modern DevOps practices. The examples and code I shared here can be adapted directly in your environment for better structure and control of your campaign management.


